Python is No Good for Mortality Rates

Here we are at the uptick in the Covid 19 pandemic. There are many sources of data which list infections and deaths as a result of the virus. It’s very tempting to want to put your Python skills to use and crunch some numbers on the infection. By and large, go for it, but one thing I’d ask you not to do is to try to calculate a “mortality rate”. This is not because Python can’t do division but, rather, working this number out is conceptually pretty tricky. It’s something that epidemiologists need to get a lot of training in to do correctly.  You can’t just take the deaths column and divided it by the infected column because the two numbers are not properly related. For example:

  • Testing is incomplete. There is a shortage of test kits where I am. So, if you present with symptoms you will not get tested unless you meet the testing protocol – that is: have you been overseas in the last 14 days; or have you been in contact with a known Covid19 case. This testing protocol means that (most) community transmission of the virus hereabouts is not included in the numbers.
  • There is evidence to believe that a large cohort of those infected are asymptomatic. That is, they have no symptoms or very mild symptoms. If that’s the case, then there is a cohort of infected people who don’t feel unwell, so they don’t get tested and are, also, omitted from the infection numbers.

These factors will mean that naive division of the reported numbers will inflate the mortality rate, making it seem worse, possibly much worse, than it really is (the Economist argues [paywall] that places with extensive testing have much lower death rates – by a factor of 5 or so – simply because they are identifying more of those infected).

Ideally, if you’re going to publish these numbers make it clear what their limitations are.

PS: The Diamond Princess is probably the only cohort to have reliable infection numbers, since everyone was tested before leaving the ship. However, their mortality rate shouldn’t be used as they’re not a representative sample (ie mostly older people who are fit enough and wealthy enough to go on a cruise).

PPS: Further virus related stuff (eg on lag) to be posted on my other not actually python blog.

3: Lists

Book ref: Project 6 (pg 149ff)

Python 2.7: Mostly same, see note below

See also: Python 3/Project 6 post

Source: Python for kids

Python4kids
You have learned how to give a literal a name, like this:

name = "Brendan"

or

age = 8

Giving it a name allowed you to identify the value in the future. While strictly incorrect, people sometimes say that you are “storing” the value in the name – and they even call the name a varable.
There is a bit of a problem with this because you have to name each of the values you have one at a time.
Imagine you had a group of 3 people and your teacher told you you had to write a program to store all of their ages and to find their average age. Let’s say their ages are 8, 13 and 25. How would you do it?

Well, you could try something like this:

person1_age = 8
person2_age = 13
person3_age = 25

average_age = (person1_age+person2_age+person3_age)/3

print("average age is ", average_age)

That works,* but… The next day your teacher comes and tells you that someone else has joined and you now need to include their age (17) in your program. How do you do it?

Well, you could do this:

person1_age = 8
person2_age = 13
person3_age = 25
person4_age = 17 

average_age = (person1_age+person2_age+person3_age+person4_age)/4

print("average age is ", average_age)

To add a single extra age to your calculation you made three additions. You added a line person4_age = 17 to store the age and then you changed the average_age line to add that new variable to the calculation and also you need to keep track of the number of people and change the divided by 3 to divided by 4. The next day another person, aged 11 comes along, and you use the same way of dealing with the problem. You end up with this code:

person1_age = 8
person2_age = 13
person3_age = 25
person4_age = 17
person5_age = 11

average_age = (person1_age+person2_age+person3_age+person4_age+person5_age)/5

print("average age is ", average_age)

I hope that you’re dreading any more people arriving – but it can get much worse without any more people! Imagine your teacher asks you to write code to print out the ages in order from smallest to largest. The only way you can do that with this code is to sort the ages yourself and then print the variables in the correct order. What’s the point of learning Python if you have to do the calculations yourself?

Luckily Python has a way of storing these values that makes doing things like this easy. It’s called a list. You can create a list of values by putting a comma between each pair of values and surrounding the whole lot by square brackets []. For example, say your values are 1 and 4, you would create a list like this:

>>> [1, 4]
[1, 4]

There’s a comma in between them and they’re surrounded by square brackets []. You can add more entries in the list by adding a comma then the new entry:

>>> [1, 4, 8]
[1, 4, 8]

A list can be empty – contain no values. It looks like this:

>>> []
[]

A list with only one value looks like this (no commas):

>>> [1]
[1]

You name a list in the same way you name any other value:

>>> a_list = [1, 2, 3, 4]

So, for the ages you had above you could make a list like this:

>>> ages = [8, 13, 25, 17, 11]
>>>

In Python lists can sort themselves. You just add .sort() to the name of the list and it will become sorted. Like this:

>>> ages.sort()
>>> ages
[8, 11, 13, 17, 25]

Python calls the number of entries in a list its length. To get this number you use the len() facility. Like this:

>>> len(ages)
5

This says that the list called ages has 5 entries in it (count them yourself to confirm it’s correct).

You can add all of the entries in a list by using the sum() facility.

>>> sum(ages)
74

So, you can simplify your average age program above like this:

ages = [8, 13, 25, 17, 11]
print ("average age is ", sum(ages)/len(ages))

Amazing? It’s certainly much simpler. Test that it works for any number of ages by adding and removing ages to the ages list. If the age list is empty you’ll break the code. Try it and see.

You can tackle the requirement to put them in order very easily as well:

ages = [8, 13, 25, 17, 11]
print ("average age is ", sum(ages)/len(ages))
ages.sort() 
print ("ages in order are: ", ages)

Aside:
You didn’t notice, but the .sort() facility on the list ages is unusual because it changes the list itself. In Python it is more usual for these facilities to leave the thing they are working on unchanged and to return a new value for you. Normally you can count on the thing you started with not changing.

* Note: as you learned in Python for Homework Python 2.7 carries out division differently from Python 3. For Python 2.7 it is better to use float(3) or 3.0, otherwise Python will round the result. See Python for Homework for more details.

3: Comments

Book ref: Project 4 (pg 95ff)

Python 2.7: Same

In this post you’re going to learn how to write code that Python ignores. Does that seem odd?
What would be the point of writing code and then deliberately not using it? It turns out that
there are two important times when you would prefer that Python did not execute your code:

  • comments, which you’ll be learning about in this post; and
  • debugging, which you’ll learn about later.

There are two main ways to make a comment in Python. The first is to put a hash mark (#) in
front of the comment. Here is an example:

>>> # This code does nothing
>>> 

Hopefully you can see that the text with the # in front of it was ignored by the Python interpreter.
You can see that this is the case by trying it without the # and seeing what happens.

>>> This code doesn't do anything
SyntaxError: invalid syntax
>>>

Without the # Python tries to run the comment as if it was Python code – and, of course, fails.

Aside
Whenever you are not sure about how something works in Python open up a Python console and give it a try and see what happens. Often, if there is a mistake Python will give you an error message that will help you work out how to do it correctly.

The second way of making a comment is by putting triple double quotes (“””) on both sides of the comment. Like this:

>>> """ This code does nothing"""
" This code does nothing"

You can see from the print out that while the # comment above really did nothing, this code has done something – it’s printed out the content of the comment. It did this because it has created a string literal but hasn’t given it a name. In practical terms though, the code has done nothing. The only reason that it has printed out the comment is because you are running the Python console. If you ran this from a file (see the python idle post for more info), nothing would be printed.

Aside
Technically the other ways of making string literals will work as comments, but the accepted way of doing it is by using triple double quotes.

What are comments for?

You use comments mainly to explain to someone else what your code is doing (try to imagine that you’re trying to explain your code to your parents). As such, comments should explain why, not describe how. This is a bad comment:

>>> a = a*2 # multiply a by 2

This is a bad comment because it simply repeats in words what the code is doing. Anybody reading the code can work that out for themselves, so it’s not adding anything. It is better to explain why the code is doing whatever it is doing.

This might be a better comment:

>>> a = a*2 # the next section of code below needs a to be even

In this code, the comment is explaining why a is being multplied by 2. That is, to make sure that a is an even number. We can’t tell from this why it’s important for a to be even, but we can tell why the code is doubling a.

Explanatory comments like these turn out to be very important. That’s because you often need to come back to code that you’ve written a long time ago (like last month). If you don’t have comments explaining why the code is doing what it’s doing it can be very difficult to understand what is going on. So, it’s difficult to reuse the code for other projects, or two tweak the code to cater to new circumstances.

In general, comments are a good thing. The more comments the better. That said, you can get too much of a good thing and there is a point where you have too many. Exactly how many comments are too many is hard to say. Best way is to write comments and get a feel for it yourself.

3: Getting Help

Book ref: Project 1 (pg 24ff)

Python 2.7: Same

See also: Python 3/Project 4 post

Python 3 comes with its own help facility. To use it, you simply type:

>>> help()

Welcome to Python 3.4's help utility!

If this is your first time using Python, you should definitely check out
the tutorial on the Internet at http://docs.python.org/3.4/tutorial/.

Enter the name of any module, keyword, or topic to get help on writing
Python programs and using Python modules.  To quit this help utility and
return to the interpreter, just type "quit".

To get a list of available modules, keywords, symbols, or topics, type
"modules", "keywords", "symbols", or "topics".  Each module also comes
with a one-line summary of what it does; to list the modules whose name
or summary contain a given string such as "spam", type "modules spam".

Note: you have to include the brackets help(). Just help won’t work:

>>> help
Type help() for interactive help, or help(object) for help about object.

As the text says, once you’re in the help service. To leave you type quit and press Enter.

You can get help on a specific feature by typing that feature at the help> prompt. If I type print and press Enter it tells me:

Help on built-in function print in module builtins:

print(...)
    print(value, ..., sep=' ', end='\n', file=sys.stdout, flush=False)
    
    Prints the values to a stream, or to sys.stdout by default.
    Optional keyword arguments:
    file:  a file-like object (stream); defaults to the current sys.stdout.
    sep:   string inserted between values, default a space.
    end:   string appended after the last value, default a newline.
    flush: whether to forcibly flush the stream.

On my system, this is not printed below the Python prompt. Rather, it is specially formatted (by a thing called a “pager”). To get back to the help> prompt I have to press the Q key.

The next place to look for help is in Python’s online documentation. That may be a little intimidating at the moment, but just go to it slowly. You’ll start to learn your way around it. One of the problems with learning Python 3 is that it is being continuously improved, so with each new version (I have version 3.4 installed, but the most recent version as at the time I am writing this is version 3.6) the documentation changes. Ideally, you’ll chose the version of the documentation that matches the version of Python you have installed on your computer. The good news is that for the stuff you’re learning things are unlikely to change for the foreseeable future.

Python 2.7 Notes: the same help facility is in Python 2.7.

3: Import this!

Book ref: Project 3 (pg 78ff)

Python 2.7: Same

>>> import this

Do it to learn something about the Zen of Python.

3: Using Python IDLE

Book ref: Project 4 (pg 84ff)

Python 2.7: Same

See also: Python 3/Project 4 post

You have started this new batch of tutorials working with the Python (Command Line) program. Python (Command Line) looks black and a bit ugly. It’s also a bit old fashioned in how it lets you interact with it.

python3_console

It’s important to know about Python (Command Line) because it’s the easiest way to do something quickly in Python. For example, if I want to quickly check how something works in Python I will open up a Python command line and check it. So, you start out with it because it’s something you’re going to use for the rest of your Python programming days.

The command line has some limitations. Maybe the biggest of those is that it doesn’t let you save anything, but never fear! Python has an answer to that in IDLE. IDLE is a program that helps you write Python programs. One of the many things it can do is to allow you to save your programs to use them later. Open up your menu’s search bar and type “Python”. Click the entry that says IDLE(Python GUI). You should get a window that looks like this (the words might be different):

python3_idle

See how the title of the window says Python 3.4.5 Shell? It can do pretty much everything the Python (Command line) shell can do. However, that’s not where you can save your code! Instead, you need to open a new file. Click the “File->New File” menu item (or type Ctrl+N):

python3_idle_newfile

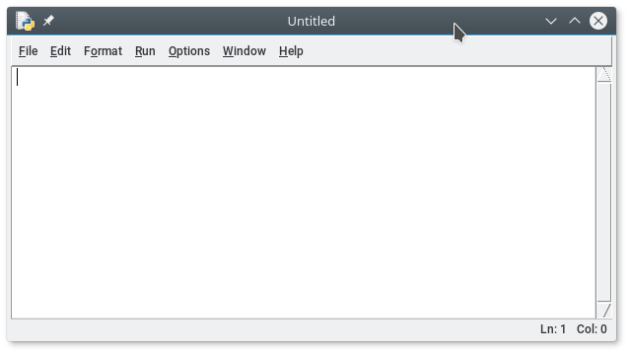
It’ll open up a new window like this:

python3_idle_newfile_fresh

Type your code in there:

print("Hello world!")

python3_idle_newfile_with_code

and press Ctrl+S to save it. You’ll get a dialog box that asks you for a name to save it under. This is naming your Python file, much like you might name a word processing document or image that you create. In this case call it helloworld.py. When saving your code, add “.py” to the end of the file name. Finally, press F5. Pressing F5 is what runs your code.

In the Shell Window you’ll get something that says “== RESTART:” and some other guff. Then, after that, it’ll show you the output of the program you saved:

Hello world!
>>>

Notice that IDLE gives different colors to different parts of your code? Try to work out what each of the colors means. IDLE has a lot of different features, project 4 of my book has more details, some of which are listed in the Python 3/Project 4 post.

3: Conditionals/if and Code Blocks

Book ref: 70ff

Python 2.7: Same, see earlier post

Note: this tutorial will be easier if you use Python-IDLE, not Python (Command Line).

So far, the programs you’ve written have gone straight from top to bottom, without skipping any lines. There are times though, when you do want a line to run only some of the time. For example, if you wrote a game, you’d only want one of these two lines of code to run:

print("Congratulations, you win!!!") 
print("Sorry, you lose.")

In fact, you’d want your code to look something like:

if player wins:
     print("Congratulations, you win!!")
otherwise:
     print("Sorry, you lose.")

Python isn’t quite that much like English, but it’s pretty close. In Python you can do this by using the if and else (not otherwise) keywords, like this:

player_wins = True

if player_wins:
    print("Congratulations, you win!!")
else:
    print("Sorry, you lose.")

You see I’ve changed the two English words player wins to a single Python name player_wins. When you run this code, you get this output:

Congratulations, you win!!

If you change the line

player_wins = True

to

player_wins = False

(try it) then this is printed:

Sorry, you lose.

You need to remember that player_wins is just the name you’re using to store a value, the program can’t tell whether the player has won or lost. You need to set the value beforehand. You also need to notice that player_wins takes only two values – True and False (True and False are special values in Python, but you can take them as having their English meanings).

The if keyword needs to be followed by something that is either True or False. It could be a variable that holds one of those values or it could be an expression (see below) that evaluates to them. After “that something” you put a colon. The colon tells Python that a new code block is about to start. On the next line the code in the code block is indented. This indenting is important. Python will complain if the code is not indented (try it). If you want more things to happen, then you can put in more lines of code, as long as they’re all indented at the same level – that is, they have the same number of spaces in front of them (try 4 spaces in front). When you do more Python you’ll discover that you can put code blocks within code blocks – but that’s for later.

After the code block comes another keyword, else, followed by a colon and another code block. The else keyword serves the function of word otherwise in my mock code above. It is run if the if isn’t. After the else is another code block. This is indented like the first one and, like the first one, can contain more lines of code, as long as they are all indented with the same number of spaces in front of them.

Visually indented code blocks are one of Python’s great programming features. Most languages have code blocks, but few of them require them to be shown visually with indents. This makes Python programs easier to read and follow.

If you don’t have alternative code that is to be run if the conditional is not True, then you can leave out the else: and its code block. So, if you want to say Happy Birthday if it’s someone’s birthday, but nothing if it’s not, you could do something like this:

players_birthday = False

if players_birthday:
    print("Happy Birthday!")

When you run this code, it doesn’t print anything, because you’ve set players_birthday = False and have not included an else block. Set players_birthday = True and see what happens.

Expressions

Rather than setting a value of True or False expressly, you can include a comparison. Python has a lot of comparisons but the main ones are == (equal- note the two equal signs together, not one), > (greater than) and < (less than). Here are some of them in action:

>>> 1 == 1
True
>>> 1 == 2
False
>>> 1 > 2
False
>>> 1 < 2
True

See how they give either a True or False result? Try some yourself. Make sure you know the difference between 1 = 2 and 1 == 2.

Going back to our earlier example, rather than having a name player_wins, you’re probably more likely to have something like players_score. You can then compare the score against a winning score and print your message. For example, if they players_score is 100 and a score of greater than 90 is a win you could code this:

players_score = 100

if players_score > 90:
    print("Congratulations, you win!!")
else:
    print("Sorry, you lose.")

Run it, then change players_score = 90 and run it again.

3: Getting Input

3: Getting Input

Book ref: Pg 60ff
Python 2.7: this function is called raw_input() in Python 2.7.

Pretty much any program you’re ever going to write will involve 3 parts – getting data, processing data and outputting a result. In your Hello world! program you learned one way of outputting data with the print() function. In 3: Python for Homework you learned how to process some data. But you still don’t have a way to get data into the program. That’s what this post is all about – input().

You use the input() function get string literals that the user types in at the keyboard. Try it now:

>>> input()
this was a blank line before I typed this
'this was a blank line before I typed this'

You need to type input() and hit enter to really understand what is happening here. When I typed enter, Python gave me a blank line. Then I typed “this was a blank line before I typed this” and hit enter again (you should type anything you like). Then it echoed (repeated) what I typed back to the screen.

If you put your own string literal inside the brackets the input() function will echo that literal before it gets input from the user. Here is an example:

>>> input("What is your name?")
What is your name?Brendan
'Brendan'

Instead of a blank line, input gave me a line starting with What is your name?. You can use this to tell the user what it is you want them to input. Notice also that there is no space between the question mark and the start of my answer. This is because Python has no idea about English grammar. You have to do that for Python. Remember to add a space to the end of your literals so that they look right:

>>> input("What is your name? ")
What is your name? Brendan 
'Brendan'

That space makes all the difference, don’t you think?

You can save the literals that someone types in by naming them – exactly how you saved literals in the earlier post. If you name the literal it is not echoed, but you can see it by printing the name you gave it. Here is an example:

>>> users_name = input("What is your name? ")
What is your name? Brendan 
>>> print(users_name)
Brendan 

Python thinks that everything that the user types is a string literal – so you can’t enter a number and expect to be able to add and multiply (etc) it:

>>> users_number = input("Please type in a number: ")
Please type in a number: 11
>>> users_number * 2
'1111'
>>> users_number + 2
Traceback (most recent call last):
  File "", line 1, in 
TypeError: Can't convert 'int' object to str implicitly

When you typed in 11, Python attempted to multiply it by 2 and got “1111” – that is, 11 repeated rather than 22. When you tried to add 2 to it, it failed completely. If you are expecting your user to enter a number you need to use another function, called int() to convert it to a ‘Python number’:

>>> int(users_number) * 2
22
>>> int(users_number) + 2
13

But notice, unless you rename it, the int() function does not change what’s stored (try users_number * 2 again). You can rename it by putting the name on both sides of the equal sign like this:

>>> users_number = int(users_number)
>>> users_number * 2
22

Now, Python is happy to treat this as an honest-to-goodness number.

If your user inputs a decimal number, int() won’t work. In that case you need to use a similar function, called float() instead:

>>> users_number = input("Please type in a decimal number: ")
Please type in a decimal number: 2.5
>>> int(users_number)
Traceback (most recent call last):
  File "", line 1, in 
ValueError: invalid literal for int() with base 10: '2.5'
>>> float(users_number)
2.5  

You can get the rough equivalent age of a dog in human years by multiplying it by 7 (purists will quibble that this is too inexact). For example, ie a 1 year old dog is roughly 7 human years old. Now write a short program to calculate the age of your dog in human years (notice here, I’m printing more than one thing by adding a comma between the things I’m printing):

>>> dog_age = input("How old is your dog? ")
How old is your dog? 2.5
>>> print("Your dog is about ", float(dog_age)*7, " years old.")
Your dog is about  17.5  years old.

Try it now!

3: Python for Homework

Book ref: Pg 64-66

If you are ever stuck for a calculator, Python can be a stand in for you. It is able to do any calculations that a calculator can do. Some things might be easier on a calculator, but, since Python is a general purpose programming language, there’s a heap of things that Python can calculate that your calculator can’t.
Addition and subtraction are pretty straight forward, just use the + and – keys on your keyboard like this:

>>> 1+1
2
>>> 2-1
1

Try some yourself.

In the last post you were using string literals. Here you’re using numbers, but you can use them in the same way that you can with string literals. For example, you can give them names (here, I’m using a and b as very simply names):

>>> a = 1
>>> b = 2

As in the last post, once you’ve named them you can use the names to refer to the numbers indirectly:

>>> a + b
3
>>> b - a 
1

Addition and subtraction are easy because you have a plus and minus sign on your keyboard. Not so multiplication or division! Since there’s no times sign on the keyboard, and you aren’t able to write a number on top of another for divide, Python instead uses symbols that are already on your keyboard, You use * for multiply and / for divide (on my keyboard * is Shift-8 and / is next to my right hand Shift key). Note that / starts in the bottom left and goes to the top right. You don’t want \ – that’s a different character. Here are some examples:

>>> 2*3
6
>>> 6/2
3.0

Try some yourself!

In the example above, see that the answer 6/2 gives a decimal answer (ie it ends in .0), even though 2*3 doesn’t. It used to in Python 2. In Python 2 you’d get this:

>>> 6/2
3

However, Python 2 also did this:

>>> 7/2
3

When you used / for division and both numbers were whole numbers, Python 2 would round the answer down to the next whole number. If you want to do this in Python 3 (stranger things have happened!) you use a double slash //. Like this:

>>> 7/2
3.5
>>> 7//2
3

The other thing you might be interested in trying is raising a number to a power. To do this in Python you use a double star: **. To calculate 3 squared and cubed respectively you would type:

>>> 3**2
9
>>> 3**3
27

To find the square, or cube root, you raise to the power of 0.5 and 1/3 respectively:

>>> 9**(0.5)
3.0
>>> 27**(1/3)
3.0

Python has the advantage that it can calculate stuff really quickly and display many more digits than your calculator can. If you want to know what 2 to the thousand is, Python can work it out in the blink of an eye:

>>> 2**1000
10715086071862673209484250490600018105614048117055336074437503883703510511249361224931983788156958581275946729175531468251871452856923140435984577574698574803934567774824230985421074605062371141877954182153046474983581941267398767559165543946077062914571196477686542167660429831652624386837205668069376L

Try some yourself. If your computer stops responding Ctrl-C should stop it. If not, close the window and restart Python.

3: A Literal Assignment

Book ref: page 39ff

In the previous post you learned about Python’s print feature*. In that post you used print  to display the text:

hello world!

You did that by putting single quotes/apostrophes/inverted commas (‘) around the text to be displayed:

'hello world!'

This thing (inside the single quotes) is called a literal. In fact, it’s a string literal.  You can create any string you like at the command line by typing it in with single quotes around it:

>>> ‘hello world!’
‘hello world!’

Try creating some of your own now.  If you try to type a string at the command line without the single quotes Python gets upset:

>>> hello world!
 File "<stdin>", line 1
 hello world!
 ^
SyntaxError: invalid syntax

This failed because there were no quotes around the string.

When you create a literal, Python stores it in memory. However, you can’t get to that literal, because you don’t know where Python has stored it. You can know where Python stores the literal by giving it a name. You do that by:

  1. Thinking of a name
  2. Using the = give the name to the literal.

Here’s an example:

>>> a_name = 'hello world!'
>>>

In this case, the name is a_name. You can choose any name you like, subject to some constraints (see page 42 of my book). The main things to mention are that names can’t have spaces in them, and can’t start with a number:

>>> a name = 'hello world!'
 File "<stdin>", line 1
 a name = 'hello world!'
 ^
SyntaxError: invalid syntax
>>> 1stname = 'hello world!'
  File "<stdin>", line 1
    1stname = 'hello world!'
          ^
SyntaxError: invalid syntax

In the first case, there’s a space after the a. In the second the name starts with a number. Remember to put a single quote at the start and at the end of the string.  Think up a name and assign it to ‘hello world!’ (or think up some other string!).

After you give a name to a literal then, whenever you use that name, it’s the same as retyping the literal:

>>> a_name = 'hello world!'
>>> a_name
'hello world!'
>>> print(a_name)
hello world!

Can you see that print(a_name) gives the same output as print(‘hello world!’)? That’s because thinks if Python is happy to let you Then putting that inside some brackets ():

('hello world!)

Then putting that on the right hand side of print:

print(‘hello world!’)

The text with the

* Actually, “function” is the technical term. You’ll learn about functions in a later post.

3: Hello World!

For those of you interested in learning Python 3, I’m going to start revisiting old blog posts, updating them for Python 3. They might, but probably won’t, be repeating the same order as the original. Python 3 posts will start with a 3 (in case you hadn’t worked out the 3: at the start of this posts’ title).  To do these posts I’m assuming that you’ve:

  1. Installed a version of Python starting with 3 (if you have a version starting with 2, start here).  If you haven’t installed it, follow the instructions on the Getting Started page.
  2. Managed to open Python (command line). You can also use the IDLE editor (and you’ll get onto that later anyways).

For some reason, lost to the mists of time, the first program you write in any language is supposed to be a program, called “Hello World”, that gets the computer to say “hello world”.    So here it is. Open up your Python prompt. You should see something like this:

>>>

That thing’s the Python prompt.  Type everything after the >>> in the first line here:

>>> print('hello world!')
hello world!
>>>

When you press the Enter* button at the end of the first line, “hello world!” appears on the next line.  Make sure that you type:

print('hello world!')

in exactly. That is,  (don’t type >>>) but make sure you include the (, ‘, ‘ and ).  If you leave any of them out, it won’t work (try it).

Congratulations, you’re now a programmer (in training).


*  If you are on a Mac, think “Return Button” whenever I say  Enter button.


Python for Kids: Bonus Project 1

In these posts I outline the contents of each project in my book Python For Kids For Dummies. If you have questions or comments about the project listed in the title post them here. Any improvements will also be listed here.

Bonus Projects!

Did you know that, in addition to the projects in my book, there are an addition 3 bonus projects available online? Hello GUI World, a Spline Drawing Program and Minecraft+Py+Pi. They were originally intended to be included in the book, but then they didn’t fit (which is a shame, since they were the book’s apotheosis). Happily for you though, they’re now online! – and there’s over 100 pages of extra material ! – it’s like you’re getting an extra third of the book! You can even do them even if you don’t have the book! It’s so exciting!! Follow the link in the sidebar to get them, even if you think I’ve overdone the exclamation points!!!

What’s in Bonus Project 1 (Hello GUI World!)

The body of the book lays the foundation for this project and Bonus Project 2. In this project you get to escape the shackles of the command line and create a graphical user environment (GUI) using the Tkinter widget toolkit that is included with Python.

This Project introduces the concept of a widget and introduces you to Label and Button widgets. You learn about callbacks. These are what you need to program in order for something to happen when you click the a button (for example). You learn how to change the configuration of widgets. This allows you, for example, to change the text that is displayed in the widget and the color of a widget.

Since you also need to know how to arrange different widgets in a window, the Project also covers the two main geometry managers (grid and pack). You’re shown how to open and close Tkinter applications and how to use the premade dialog boxes that come with Tkinter (tkMessageBox and tkFileDialog).

Improvements:
If you want to extend yourself, the accompanying cheatsheet contains a list of widgets, with some sample code needed to get the widgets working.
None atm.

Python for Kids: Python 3 Summary of Changes

While my Python 3 posts seemed to stretch for pages and pages with differences, there actually aren’t very many changes at all. Most of that space is taken up by the code outputs (which often had only minor changes) and unchanged code (that had to be there for context). In fact, while the book is about 300 pages long, just a handful of changes are needed to get the whole of the code in the book to run in Python 3. Those changes (in alphabetical order by topic) are below. Check them out if you’re having trouble with your other Python 2.7 code:

Links to the Python 3 updates for each of the Projects:

Project 2, Project 3, Project 4, Project 5, Project 6, Project 7, Project 8, Project 9, Project 10.

class

In Python 3, classes inherit from object automatically, so you don’t need (object) in the first line of the class definition. It’s not an error, but it is superfluous.

# Python 2.7
>>> class AddressEntry(object):
        """
        AddressEntry instances hold and manage details of a person
        """
        pass

# Python 3
>>> class AddressEntry: # note: no (object)
        """
        AddressEntry instances hold and manage details of a person
        """
        pass

Floating point division

Python 2 code in the book will work with Python 3. Some changes to floating point is now automatic in Python 3, so the code to change a number into floating point (eg float(2)) is unnecessary.

import cPickle as pickle

Python 3 uses cPickle by default, so replace import cPickle as pickle by just import pickle. If you try to import cPickle, you’ll get an error.

open

In Python 3 open() has the same syntax as in Python 2.7, but uses a different way to get data out of the file and into your hands. As a practical matter this means that some Python 2.7 code will sometimes cause problems when run in Python 3. If you run into such a problem (open code that works in Python 2.7 but fails in Python 3), the first thing to try is to add the binary modifier – you’ll need it when reading and writing pickle files for instance. So, instead of ‘r’ or ‘w’ for read and write use ‘rb’ or ‘wb’.

#Python2.7
>>> import pickle
>>> FILENAME = "p4k_test.pickle"
>>>  dummy_list = [x*2 for x in range(10)]
>>>  with open(FILENAME,'w') as file_object: #now dump it!
        pickle.dump(dummy_list,file_object)

>>> # open the raw file to look at what was written
>>> with open(FILENAME,'r') as file_object: # change w to r!!!
        print(file_object.read())

#Python3
>>> import pickle
>>> FILENAME = "p4k_test.pickle"
>>>  dummy_list = [x*2 for x in range(10)]
>>>  with open(FILENAME,'wb') as file_object: #### note: 'wb' not 'w'
        pickle.dump(dummy_list,file_object)

>>> # open the raw file to look at what was written
>>> with open(FILENAME,'rb') as file_object:  ##### note 'rb' not 'r'
        print(file_object.read())        

print

Print – mostly the same, since I used Python 3 print syntax in the book. There is an issue with the print continuation character (trailing comma). That needs to be replaced by an end parameter:

#Python 2.7 code:
>>> my_message = "Hello World!"
>>> while True:
...       print(my_message), #<- notice the comma at the end ... #Python 3 >>> my_message = 'Hello World!'
>>> while True:
...       print(my_message, end="")
...

If you’re using Python 2.7 code that’s not in my book, it might look like this:

#Python 2.7 code:
>>> print "Hello World"

To make this work in Python 3, you put brackets around what’s to be printed:

#Python 3
>>> print("Hello World")

raw_input v input

In Python 3 replace raw_input by input wherever you see it. Literally, input is simply a new name for raw_input.

Range vs xrange

The book uses range in anticipation of upgrading to Python 3, so mostly the code will work without changes! If you have code that uses xrange, just rename it to range and all should be well.

In one case the code assumed that the output of range is a list (which is is in Python 2.7, but not in Python 3). The code’s syntax was correct, but led to a logical error. That was corrected by choosing a way to test for the end of the loop that didn’t assume a list was involved.

Python for Kids: Python 3 – Project 10

Using Python 3 in Project 10 of Python For Kids For Dummies

In this post I talk about the changes that need to be made to the code of Project 10 of my book Python for Kids for Dummies in order for it to work with Python 3. The main difference between the Python 2.7 and Python 3 code for this project is that Python 3 uses raw_input and that has been renamed to input in Python 3. Most of the code in project 10 will work with this one change. However, in a lot of cases what Python outputs in Python 3 is different from the output in Python 2.7. This project has a lot of code. In order to shorten the length of this post I am only showing the Python 3 versions of the longer pieces (rather than both Python 2.7 (from the book) and Python 3). Look at the book to see the Python 2.7 code (it’s very similar).

Disclaimer

Some people want to use my book Python for Kids for Dummies to learn Python 3. I am working through the code in the existing book, highlighting changes from Python 2 to Python 3 and providing code that will work in Python 3. If you are using Python 2.7 you can ignore this post. This post is only for people who want to take the code in my book Python for Kids for Dummies and run it in Python 3.

######## Page 283

The code on this page uses raw_input, which has been renamed to input in Python 3. You can either replace all occurrences of raw_input with input or add a line:

raw_input = input 

at the start of the relevant code. In order to reduce the amount of code being repeated, I am adding raw_input = input to the Constants section of the code. You will need to remember that all of the later code assumes that this line has been added.

  
"""
Python 2.7
math_trainer.py
Train your times tables.
Initial Features:
* Print out times table for a given number.
* Limit tables to a lower number (default is 1)
and an upper number (default is 12).
* Pose test questions to the user
* Check whether the user is right or wrong
* Track the user's score.
Brendan Scott
February 2015
"""
#### Constants Section
TEST_QUESTION = (4, 6)
QUESTION_TEMPLATE = "What is %sx%s? "
#### Function Section
#### Testing Section
question = TEST_QUESTION
prompt = QUESTION_TEMPLATE%question
correct_answer = question[0]*question[1] # indexes start from 0
answer = raw_input(prompt)
if int(answer)== correct_answer:
    print("Correct!")
else:
    print("Incorrect")

>>> ================================ RESTART ================================
>>>
What is 4x6? 24
Correct!
>>> ================================ RESTART ================================
>>>
What is 4x6? 25
Incorrect


"""
Python 3
math_trainer.py
Train your times tables.
Initial Features:
* Print out times table for a given number.
* Limit tables to a lower number (default is 1)
and an upper number (default is 12).
* Pose test questions to the user
* Check whether the user is right or wrong
* Track the user's score.
Brendan Scott
February 2015
"""
#### Constants Section
raw_input = input # this line added
TEST_QUESTION = (4, 6)
QUESTION_TEMPLATE = "What is %sx%s? "

#### Function Section

#### Testing Section
question = TEST_QUESTION
prompt = QUESTION_TEMPLATE%question
correct_answer = question[0]*question[1] # indexes start from 0
answer = raw_input(prompt)
if int(answer)== correct_answer:
    print("Correct!")
else:
    print("Incorrect")

>>> ================================ RESTART ================================
>>>
What is 4x6? 24
Correct!
>>> ================================ RESTART ================================
>>>
What is 4x6? 25
Incorrect

######## Page 286-296

All code on this page is the same, and all outputs from the code is the same in Python 3 as in Python 2.7.
Remember that for the code to work in Python 3 code an additional line

raw_input = input

as added in the Constants section of the code.

######## Page 297

All code on this page is the same, and all outputs from the code is the same in Python 3 as in Python 2.7.

######## Page 298
The code in this section is different in Python 2.7 v Python 3.
The Python 2.7 code assumed that there was a list and that a while loop repeatedly removed things from that list. When everything was removed then the loop stopped. This was achieved by a test

batch != []

that is, stop when the variable batch is an empty list.
Ultimately, what is in batch comes from a call to the range builtin:

tables_to_print = range(1, upper+1)

In Python 2.7 this is a list which is generated in full and stored in tables_to_print. In Python 3 it’s not. Rather the range builtin generates the values that are needed at the time they are needed – not before. In Python 3 batch is a “range object”, not a list. And, while batch gets shorter and shorter, it’s never going to be an empty list (it would need to stop being a range and start being a list), no matter how long the program runs. To get this code working in Python 2.7 you can either:
(A) explicitly make batch a list by changing the line:

tables_to_print = range(1, upper+1)

to

tables_to_print = list(range(1, upper+1))

this changes all the relevant variables (and, in particular batch) into lists so the condition in the while loop will evaluate as you expect; or

(B) change the condition in the while loop to check the length of batch rather than whether or not it is an empty list. That is change:

 
    while batch != []: # stop when there's no more to print

to

 
    while len(batch) > 0: # stop when there's no more to print

That is, once the length is 0 (ie no more elements to display), stop the loop. I think this is the better of the two options because it makes the test independent of the type of variable used to keep track of batches.

Remember that the Python 3 code has an additional line

 
raw_input = input

in the Constants section of the code.

 
#Python 2.7

TIMES_TABLE_ENTRY = "%2i x %2i = %3i "

def display_times_tables(upper=UPPER):
    """
    Display the times tables up to UPPER
    """
    tables_per_line = 5
    tables_to_print = range(1, upper+1)
    # get a batch of 5 to print
    batch = tables_to_print[:tables_per_line]
    # remove them from the list
    tables_to_print = tables_to_print[tables_per_line:]
    while batch != []: # stop when there's no more to print
        for x in range(1, upper+1):
            # this goes from 1 to 12 and is the rows
            accumulator = []
            for y in batch:
                # this covers only the tables in the batch
                # it builds the columns
                accumulator.append(TIMES_TABLE_ENTRY%(y, x, x*y))
            print("".join(accumulator)) # print one row
        print("\n") # vertical separation between blocks of tables.
        # now get another batch and repeat.
        batch = tables_to_print[:tables_per_line]
        tables_to_print = tables_to_print[tables_per_line:]


#Python 3                            
TIMES_TABLE_ENTRY = "%2i x %2i = %3i "

def display_times_tables(upper=UPPER):
    """
    Display the times tables up to UPPER
    """
    tables_per_line = 5
    tables_to_print = list(range(1, upper+1))
    # get a batch of 5 to print
    batch = tables_to_print[:tables_per_line]
    # remove them from the list
    tables_to_print = tables_to_print[tables_per_line:]
    while len(batch)>0: # stop when there's no more to print
        for x in range(1, upper+1):
            # this goes from 1 to 12 and is the rows
            accumulator = []
            for y in batch:
                # this covers only the tables in the batch
                # it builds the columns
                accumulator.append(TIMES_TABLE_ENTRY%(y, x, x*y))
            print("".join(accumulator)) # print one row
        print("\n") # vertical separation between blocks of tables.
        # now get another batch and repeat.
        batch = tables_to_print[:tables_per_line]
        tables_to_print = tables_to_print[tables_per_line:]
        

######## Page 302, 304
All code on this page is the same, and all outputs from the code is the same in Python 3 as in Python 2.7.
Remember that the Python 3 code has an additional line

   
raw_input = input 

in the Constants section of the code.

######## Page 305-306

All code on this page is the same, and all outputs from the code is the same in Python 3 as in Python 2.7.

######## Page 307
All code on this page is the same, and all outputs from the code is the same in Python 3 as in Python 2.7.
Remember that the Python 3 code has an additional line

   
raw_input = input

in the Constants section of the code.

#########################################
### Full Code:
#########################################

The code in this section is different in Python 2.7 v Python 3.
The Python 3 code has an additional line
raw_input = input
in the Constants section of the code and the line

   
    while batch != []: # stop when there's no more to print

has been changed to

   
    while len(batch) > 0: # stop when there's no more to print
     
"""
math_trainer.py
Train your times tables.
Initial Features:
* Print out times table for a given number.
* Limit tables to a lower number (default is 1) and
an upper number (default is 12).
* Pose test questions to the user
* Check whether the user is right or wrong
* Track the user's score.
Brendan Scott
February 2015
"""

#### Imports Section
import random
import sys
import time

#### Constants Section
TEST_QUESTION = (4, 6)
QUESTION_TEMPLATE = "What is %sx%s? "
LOWER = 1
UPPER = 12
MAX_QUESTIONS = 10 # for testing, you can increase it later
TIMES_TABLE_ENTRY = "%2i x %2i = %3i "

INSTRUCTIONS = """Welcome to Math Trainer
This application will train you on your times tables.
It can either print one or more of the tables for you
so that you can revise (training) or you it can test
you on your times tables.
"""
CONFIRM_QUIT_MESSAGE = 'Are you sure you want to quit (Y/n)? '
SCORE_TEMPLATE = "You scored %s (%i%%) in %.1f seconds"

#### Function Section
def make_question_list(lower=LOWER, upper=UPPER, random_order=True):
    """ prepare a list of questions in the form (x,y)
    where x and y are in the range from LOWER to UPPER inclusive
    If random_order is true, rearrange the questions in a random
    order
    """
    spam = [(x+1, y+1) for x in range(lower-1, upper)
                       for y in range(lower-1, upper)]
    if random_order:
        random.shuffle(spam)
    return spam

def display_times_tables(upper=UPPER):
    """
    Display the times tables up to UPPER
    """
    tables_per_line = 5
    tables_to_print = range(1, upper+1)
    # get a batch of 5 to print
    batch = tables_to_print[:tables_per_line]
    # remove them from the list 
    tables_to_print = tables_to_print[tables_per_line:]
    while batch != []: # stop when there's no more to print
        for x in range(1, upper+1):
            # this goes from 1 to 12 and is the rows 
            accumulator = []
            for y in batch:
                # this covers only the tables in the batch
                # it builds the columns
                accumulator.append(TIMES_TABLE_ENTRY%(y, x, x*y))
            print("".join(accumulator)) # print one row
        print("\n") # vertical separation between blocks of tables.
        # now get another batch and repeat. 
        batch = tables_to_print[:tables_per_line]
        tables_to_print = tables_to_print[tables_per_line:]

    
def do_testing():
    """ conduct a round of testing """
    question_list = make_question_list()
    score = 0
    start_time = time.time()
    for i, question in enumerate(question_list):
        if i >= MAX_QUESTIONS:
            break
        prompt = QUESTION_TEMPLATE%question
        correct_answer = question[0]*question[1]
        # indexes start from 0
        answer = raw_input(prompt)

        if int(answer) == correct_answer:
            print("Correct!")
            score = score+1
        else:
            print("Incorrect, should have "+\
                  "been %s"%(correct_answer))

    end_time = time.time()
    time_taken = end_time-start_time
    percent_correct = int(score/float(MAX_QUESTIONS)*100)
    print(SCORE_TEMPLATE%(score, percent_correct, time_taken))

def do_quit():
    """ quit the application"""
    if confirm_quit():
        sys.exit()
    print("In quit (not quitting, returning)")

def confirm_quit():
    """Ask user to confirm that they want to quit
    default to yes 
    Return True (yes, quit) or False (no, don't quit) """
    spam = raw_input(CONFIRM_QUIT_MESSAGE)
    if spam == 'n':
        return False
    else:
        return True    


#### Testing Section

#do_testing()
##display_times_tables()

#### Main Section

if __name__ == "__main__":
    while True:
        print(INSTRUCTIONS)
        raw_input_prompt = "Press: 1 for training,"+\
                           " 2 for testing, 3 to quit.\n"
        selection = raw_input(raw_input_prompt)
        selection = selection.strip()
        while selection not in ["1", "2", "3"]:
            selection = raw_input("Please type either 1, 2, or 3: ")
            selection = selection.strip()

        if selection == "1":
            display_times_tables()
        elif selection == "2":
            do_testing()
        else:  # has to be 1, 2 or 3 so must be 3 (quit)
            do_quit()


"""
math_trainer.py (Python 3)
Train your times tables.
Initial Features:
* Print out times table for a given number.
* Limit tables to a lower number (default is 1) and
an upper number (default is 12).
* Pose test questions to the user
* Check whether the user is right or wrong
* Track the user's score.
Brendan Scott
February 2015
"""

#### Imports Section
import random
import sys
import time

#### Constants Section
raw_input = input
TEST_QUESTION = (4, 6)
QUESTION_TEMPLATE = "What is %sx%s? "
LOWER = 1
UPPER = 12
MAX_QUESTIONS = 10 # for testing, you can increase it later
TIMES_TABLE_ENTRY = "%2i x %2i = %3i "

INSTRUCTIONS = """Welcome to Math Trainer
This application will train you on your times tables.
It can either print one or more of the tables for you
so that you can revise (training) or you it can test
you on your times tables.
"""
CONFIRM_QUIT_MESSAGE = 'Are you sure you want to quit (Y/n)? '
SCORE_TEMPLATE = "You scored %s (%i%%) in %.1f seconds"

#### Function Section
def make_question_list(lower=LOWER, upper=UPPER, random_order=True):
    """ prepare a list of questions in the form (x,y)
    where x and y are in the range from LOWER to UPPER inclusive
    If random_order is true, rearrange the questions in a random
    order
    """
    spam = [(x+1, y+1) for x in range(lower-1, upper)
                       for y in range(lower-1, upper)]
    if random_order:
        random.shuffle(spam)
    return spam

def display_times_tables(upper=UPPER):
    """
    Display the times tables up to UPPER
    """
    tables_per_line = 5
    tables_to_print = range(1, upper+1)
    # get a batch of 5 to print
    batch = tables_to_print[:tables_per_line]
    # remove them from the list 
    tables_to_print = tables_to_print[tables_per_line:]
    while len(batch) > 0: # stop when there's no more to print
        for x in range(1, upper+1):
            # this goes from 1 to 12 and is the rows 
            accumulator = []
            for y in batch:
                # this covers only the tables in the batch
                # it builds the columns
                accumulator.append(TIMES_TABLE_ENTRY%(y, x, x*y))
            print("".join(accumulator)) # print one row
        print("\n") # vertical separation between blocks of tables.
        # now get another batch and repeat. 
        batch = tables_to_print[:tables_per_line]
        tables_to_print = tables_to_print[tables_per_line:]

    
def do_testing():
    """ conduct a round of testing """
    question_list = make_question_list()
    score = 0
    start_time = time.time()
    for i, question in enumerate(question_list):
        if i >= MAX_QUESTIONS:
            break
        prompt = QUESTION_TEMPLATE%question
        correct_answer = question[0]*question[1]
        # indexes start from 0
        answer = raw_input(prompt)

        if int(answer) == correct_answer:
            print("Correct!")
            score = score+1
        else:
            print("Incorrect, should have "+\
                  "been %s"%(correct_answer))

    end_time = time.time()
    time_taken = end_time-start_time
    percent_correct = int(score/float(MAX_QUESTIONS)*100)
    print(SCORE_TEMPLATE%(score, percent_correct, time_taken))

def do_quit():
    """ quit the application"""
    if confirm_quit():
        sys.exit()
    print("In quit (not quitting, returning)")

def confirm_quit():
    """Ask user to confirm that they want to quit
    default to yes 
    Return True (yes, quit) or False (no, don't quit) """
    spam = raw_input(CONFIRM_QUIT_MESSAGE)
    if spam == 'n':
        return False
    else:
        return True    


#### Testing Section

#do_testing()
##display_times_tables()

#### Main Section

if __name__ == "__main__":
    while True:
        print(INSTRUCTIONS)
        raw_input_prompt = "Press: 1 for training,"+\
                           " 2 for testing, 3 to quit.\n"
        selection = raw_input(raw_input_prompt)
        selection = selection.strip()
        while selection not in ["1", "2", "3"]:
            selection = raw_input("Please type either 1, 2, or 3: ")
            selection = selection.strip()

        if selection == "1":
            display_times_tables()
        elif selection == "2":
            do_testing()
        else:  # has to be 1, 2 or 3 so must be 3 (quit)
            do_quit()

Python for Kids: Python 3 – Project 9

Using Python 3 in Project 9 of Python For Kids For Dummies

In this post I talk about the changes that need to be made to the code of
Project 9 in order for it to work with Python 3. Most of the code in project 9 will work without changes.
However, in a lot of cases what Python outputs in Python 3 is different from the output in Python 2.7.
This project has a lot of code. To shorten the length of this post I am only showing the Python 3 versions of
the longer pieces, rather than both Python 2.7 (from the book) and Python 3.

Disclaimer

Some people want to use my book Python for Kids for Dummies to learn Python 3.
I am working through the code in the existing book, highlighting changes from Python 2 to Python 3
and providing code that will work in Python 3. If you are using Python 2.7 you can ignore this post.
This post is only for people who want to take the code in my book Python for Kids for Dummies and
run it in Python 3.

Page 240
All code on this page is the same, and all outputs from the code is the same in Python 3 as in Python 2.7.
However, in Python 3 you don’t need to add “(object)” when defining a class – it is assumed.
It is not an error to add (object) in Python 3, it just doesn’t look as nice. For example, on this page a class is defined
using class AddressEntry(object): (in Python 2.7). In Python 3 it’s just class AddressEntry:


>>> class AddressEntry(object):
        """
        AddressEntry instances hold and manage details of a person
        """
        pass
        
       
>>> AddressEntry # without parentheses
<class '__main__.AddressEntry'>
>>>
                            
                            
>>> AddressEntry() # parentheses create an instance
<__main__.AddressEntry object at 0x7f9309751590>


>>> address_entry = AddressEntry()
                         
                         
# Python 3 
>>> class AddressEntry: # note: no (object)
        """
        AddressEntry instances hold and manage details of a person
        """
        pass
        
       
>>> AddressEntry # without parentheses
<class '__main__.AddressEntry'>
>>>
                            
                            
>>> AddressEntry() # parentheses create an instance
<__main__.AddressEntry object at 0x7f9309751590>


>>> address_entry = AddressEntry()

Page 241
All code on this page is the same, and all outputs from the code are the same in Python 3 as in Python 2.7.

Page 242
All code on this page is the same, and all outputs from the code is the same in Python 3 as in Python 2.7.
You still need to use () when creating instances of an object. That is, making an instance of a class, rather than
defining the class.

Page 244
All code on this page is the same, and all outputs from the code is the same in Python 3 as in Python 2.7
However, in Python 3 you don’t need to add “(object)” when defining a class – it is assumed.
It is not an error to add (object) in Python 3, it just doesn’t look as nice.

    
Python 2.7
"""
Addressbook.py
An address book program to store details of people I know.
Stuff I'm storing is:
first name
family name
email address
date of birth
[other stuff]
Brendan Scott
Feb 2015
"""
##### Classes Section
class AddressBook(object):
    """
    AddressBook instances hold and manage a list of people
    """
    pass
    
    
class AddressEntry(object):
    """
    AddressEntry instances hold and manage details of a person
    """
    
    
##### Main Section
if __name__ == "__main__":
    address_book = AddressBook()
    person1 = AddressEntry()

    
# Python3
"""
Addressbook.py
An address book program to store details of people I know.
Stuff I'm storing is:
first name
family name
email address
date of birth
[other stuff]
Brendan Scott
Feb 2015
"""
##### Classes Section
class AddressBook:
    """
    AddressBook instances hold and manage a list of people
    """
    pass
    
    
class AddressEntry:
    """
    AddressEntry instances hold and manage details of a person
    """
    
    
##### Main Section
if __name__ == "__main__":
    address_book = AddressBook()
    person1 = AddressEntry()
    

Page 245
All code on this page is the same, and all outputs from the code are the same in Python 3 as in Python 2.7.

Page 246
All code on this page is the same, and all outputs from the code is the same in Python 3 as in Python 2.7.
However, in Python 3 you don’t need to add “(object)” when defining a class – it is assumed.
It is not an error to add (object) in Python 3, it just doesn’t look as nice.

    
#Python2.7
class AddressEntry(object):
    """
    AddressEntry instances hold and manage details of a person
    """
    def __init__(self, first_name=None, family_name=None,
                  email_address=None, date_of_birth=None):
        """Initialize attributes first_name,
        family_name and date_of_birth.
        Each argument should be a string.
        date_of_birth should be of the form "MM DD, YYYY"
        """
        self.first_name = first_name
        self.family_name = family_name
        self.email_address = email_address
        self.date_of_birth = date_of_birth
        
        
#Python3
class AddressEntry:
    """
    AddressEntry instances hold and manage details of a person
    """
    def __init__(self, first_name=None, family_name=None,
                  email_address=None, date_of_birth=None):
        """Initialize attributes first_name,
        family_name and date_of_birth.
        Each argument should be a string.
        date_of_birth should be of the form "MM DD, YYYY"
        """
        self.first_name = first_name
        self.family_name = family_name
        self.email_address = email_address
        self.date_of_birth = date_of_birth
        

Page 248
All code on this page is the same, and all outputs from the code is the same in Python 3 as in Python 2.7.
However, in Python 3 you don’t need to add “(object)” when defining a class – it is assumed.
It is not an error to add (object) in Python 3, it just doesn’t look as nice.

    
############Python 2.7
##### Classes Section
class AddressBook(object):
    """
    AddressBook instances hold and manage a list of people
    """
    pass
    
    
class AddressEntry(object):
    """
    AddressEntry instances hold and manage details of a person
    """
    def __init__(self, first_name=None, family_name=None,
                 email_address=None, date_of_birth=None):
          """Initialize attributes first_name,
          family_name and date_of_birth.
          Each argument should be a string.
          date_of_birth should be of the form "MM DD, YYYY"
          """
          self.first_name = first_name
          self.family_name = family_name
          self.email_address = email_address
          self.date_of_birth = date_of_birth
          
          
##### Main Section

if __name__ == "__main__":
    address_book = AddressBook()
    person1 = AddressEntry("Eric", "Idle", None, "March 29, 1943")
    print(person1)


############Python 3
##### Classes Section
class AddressBook:
    """
    AddressBook instances hold and manage a list of people
    """
    pass
    
    
class AddressEntry:
    """
    AddressEntry instances hold and manage details of a person
    """
    def __init__(self, first_name=None, family_name=None,
                 email_address=None, date_of_birth=None):
          """Initialize attributes first_name,
          family_name and date_of_birth.
          Each argument should be a string.
          date_of_birth should be of the form "MM DD, YYYY"
          """
          self.first_name = first_name
          self.family_name = family_name
          self.email_address = email_address
          self.date_of_birth = date_of_birth
          
          
##### Main Section

if __name__ == "__main__":
    address_book = AddressBook()
    person1 = AddressEntry("Eric", "Idle", None, "March 29, 1943")
    print(person1)

Page 250
All code on this page is the same, and all outputs from the code are the same in Python 3 as in Python 2.7.

Page 252-253
All code on this page is the same, and all outputs from the code is the same in Python 3 as in Python 2.7.
However, in Python 3 you don’t need to add “(object)” when defining a class – it is assumed.
It is not an error to add (object) in Python 3, it just doesn’t look as nice.

        
#################Python2.7
    
class AddressEntry(object):
    """
    AddressEntry instances hold and manage details of a person
    """
    def __init__(self, first_name=None, family_name=None,
                  email_address=None, date_of_birth=None):
        """initialize attributes first_name, family_name
            and date_of_birth
        each argument should be a string
        date_of_birth should be of the form "MM DD, YYYY"
        """
        self.first_name = first_name
        self.family_name = family_name
        self.email_address = email_address
        self.date_of_birth = date_of_birth
        
    def __repr__(self):
        """
        Given an AddressEntry object self return
        a readable string representation
        """
        template = "AddressEntry(first_name='%s', "+\
                   "family_name='%s',"+\
                   " email_address='%s', "+\
                   "date_of_birth='%s')"
        return template%(self.first_name, self.family_name,
                          self.email_address, self.date_of_birth)
                          
##### Functions Section

##### Main Section

if __name__ == "__main__":
    address_book = AddressBook()
    person1 = AddressEntry("Eric", "Idle", None, "March 29, 1943")
    print(person1)
    
    
#################Python3    
class AddressEntry:
    """
    AddressEntry instances hold and manage details of a person
    """
    def __init__(self, first_name=None, family_name=None,
                  email_address=None, date_of_birth=None):
        """initialize attributes first_name, family_name
            and date_of_birth
        each argument should be a string
        date_of_birth should be of the form "MM DD, YYYY"
        """
        self.first_name = first_name
        self.family_name = family_name
        self.email_address = email_address
        self.date_of_birth = date_of_birth
        
    def __repr__(self):
        """
        Given an AddressEntry object self return
        a readable string representation
        """
        template = "AddressEntry(first_name='%s', "+\
                   "family_name='%s',"+\
                   " email_address='%s', "+\
                   "date_of_birth='%s')"
        return template%(self.first_name, self.family_name,
                          self.email_address, self.date_of_birth)
                          
##### Functions Section

##### Main Section

if __name__ == "__main__":
    address_book = AddressBook()
    person1 = AddressEntry("Eric", "Idle", None, "March 29, 1943")
    print(person1)

Page 254-256
All code on this page is the same, and all outputs from the code is the same in Python 3 as in Python 2.7.
However, in Python 3 you don’t need to add “(object)” when defining a class – it is assumed.
It is not an error to add (object) in Python 3, it just doesn’t look as nice.

    
"""
Addressbook.py
An address book program to store details of people I know.
Stuff I'm storing is:
first name
family name
email address
date of birth
[other stuff]
Brendan Scott
Feb 2015
"""


##### Classes Section
class AddressBook(object):
    """
    AddressBook instances hold and manage a list of people
    """
    def __init__(self):
        """ Set people attribute to an empty list"""
        self.people = []
    def add_entry(self, new_entry):
        """ Add a new entry to the list of people in the
        address book the new_entry should be an instance
        of the AddressEntry class"""
        self.people.append(new_entry)
        
        
class AddressEntry(object):
    """
    AddressEntry instances hold and manage details of a person
    """
    def __init__(self, first_name=None, family_name=None,
                email_address=None, date_of_birth=None):
        """Initialize attributes first_name,
        family_name and date_of_birth.
        Each argument should be a string.
        date_of_birth should be of the form "MM DD, YYYY"
        """
        self.first_name = first_name
        self.family_name = family_name
        self.email_address = email_address
        self.date_of_birth = date_of_birth
    def __repr__(self):
        """
        Given an AddressEntry object self return
        a readable string representation
        """
        template = "AddressEntry(first_name='%s', "+\
                  "family_name='%s',"+\
                  "email_address='%s', "+\
                  "date_of_birth='%s')"
        return template%(self.first_name, self.family_name,
                         self.email_address, self.date_of_birth)
                         
##### Functions Section

##### Main Section

if __name__ == "__main__":
    address_book = AddressBook()
    person1 = AddressEntry("Eric", "Idle", None, "March 29, 1943")
    print(person1)
    address_book.add_entry(person1)
    print(address_book.people)


#################Python3                              
                              
"""
Addressbook.py
An address book program to store details of people I know.
Stuff I'm storing is:
first name
family name
email address
date of birth
[other stuff]
Brendan Scott
Feb 2015
"""


##### Classes Section
class AddressBook:
    """
    AddressBook instances hold and manage a list of people
    """
    def __init__(self):
        """ Set people attribute to an empty list"""
        self.people = []
    def add_entry(self, new_entry):
        """ Add a new entry to the list of people in the
        address book the new_entry should be an instance
        of the AddressEntry class"""
        self.people.append(new_entry)
        
        
class AddressEntry:
    """
    AddressEntry instances hold and manage details of a person
    """
    def __init__(self, first_name=None, family_name=None,
                email_address=None, date_of_birth=None):
        """Initialize attributes first_name,
        family_name and date_of_birth.
        Each argument should be a string.
        date_of_birth should be of the form "MM DD, YYYY"
        """
        self.first_name = first_name
        self.family_name = family_name
        self.email_address = email_address
        self.date_of_birth = date_of_birth
    def __repr__(self):
        """
        Given an AddressEntry object self return
        a readable string representation
        """
        template = "AddressEntry(first_name='%s', "+\
                  "family_name='%s',"+\
                  "email_address='%s', "+\
                  "date_of_birth='%s')"
        return template%(self.first_name, self.family_name,
                         self.email_address, self.date_of_birth)
                         
##### Functions Section

##### Main Section

if __name__ == "__main__":
    address_book = AddressBook()
    person1 = AddressEntry("Eric", "Idle", None, "March 29, 1943")
    print(person1)
    address_book.add_entry(person1)
    print(address_book.people)

Page 256

The code on this page is a little different. As explained in Project 7, the syntax for the open()
builtin is the same in Python 2.7 and Python 3, but Python 3 treats the files it opens differently
In code on this page, you are opening a file to write a “pickle” to. In Python 3 you need to open
the file with a “binary” modifier. That is, you need to use ‘wb’ rather than ‘w’. Similarly, to read
from a pickle file you need to open it using ‘rb’ rather than ‘r’.
When reading the pickle file, Python3 uses a different way of representing the data.
How it’s different is not relevant to the project, so you can ignore it. All you need
to do is notice that pickle has written something to the file and it’s encoded in some way.

    
#Python2.7
>>> import pickle
>>> FILENAME = "p4k_test.pickle"
>>>  dummy_list = [x*2 for x in range(10)]
>>>  dummy_list # confirm what it looks like
[0,  2, 4, 6, 8, 10, 12, 14, 16, 18]
>>>  with open(FILENAME,'w') as file_object: #now dump it!
        pickle.dump(dummy_list,file_object)
        
>>> # open the raw file to look at what was written
>>> with open(FILENAME,'r') as file_object: # change w to r!!!
        print(file_object.read())
        
(lp0
I0
aI2
aI4
aI6
aI8
aI10
aI12
aI14
aI16
aI18
a.

#Python3
>>> import pickle
>>> FILENAME = "p4k_test.pickle"
>>>  dummy_list = [x*2 for x in range(10)]
>>>  dummy_list # confirm what it looks like
[0,  2, 4, 6, 8, 10, 12, 14, 16, 18]
>>>  with open(FILENAME,'wb') as file_object: #now dump it!
        pickle.dump(dummy_list,file_object)

>>> # open the raw file to look at what was written
>>> with open(FILENAME,'rb') as file_object: # change w to r!!!
        print(file_object.read())        

b'\x80\x03]q\x00(K\x00K\x02K\x04K\x06K\x08K\nK\x0cK\x0eK\x10K\x12e.'
>>>         

Page 258
Code is slightly different. As explained above, use ‘rb’ to open the file, rather than ‘r’

    
## Python2.7
Python 2.7.3 (default, Apr 14 2012, 08:58:41) [GCC] on linux2
Type "copyright", "credits" or "license()" for more information.
>>> import pickle
>>> FILENAME = "p4k_test.pickle"
>>> with open(FILENAME,'r') as file_object:
          dummy_copy = pickle.load(file_object)
          
>>> dummy_copy
[0, 2, 4, 6, 8, 10, 12, 14, 16, 18]

## Python3
Python 3.3.5 (default, Mar 27 2014, 17:16:46) [GCC] on linux
Type "copyright", "credits" or "license()" for more information.
>>> import pickle
>>> FILENAME = "p4k_test.pickle"
>>> with open(FILENAME,'rb') as file_object:
          dummy_copy = pickle.load(file_object)

          
>>> dummy_copy
[0, 2, 4, 6, 8, 10, 12, 14, 16, 18]
>>> 

Page 260
Python3 now uses cPickle when you import pickle. If it can’t find cPickle
then it falls back to using the old pickle. So don’t worry about cPickle if you’re using Python 3.
As explained above, also use ‘wb’ to open the file, rather than ‘w’

    
# Python 2.7
#### Imports
import cPickle as pickle

#### Constants
SAVE_FILE_NAME = "address_book.pickle"

                          
    def save(self):
        with open(SAVE_FILE_NAME, 'w') as file_object:
              pickle.dump(self, file_object)
              
# Python 3
#### Imports
import pickle

#### Constants
SAVE_FILE_NAME = "address_book.pickle"

                          
    def save(self):
        with open(SAVE_FILE_NAME, 'wb') as file_object:
              pickle.dump(self, file_object)

Page 261
All code on this page is the same, and all outputs from the code are the same in Python 3 as in Python 2.7.

Page 262
Code is different:
* As explained above, use ‘rb’ to open the file, rather than ‘r’

    
#Python 2.7

    def load(self):
        """
        Load a pickled address book from the standard save file
        """
        with open(SAVE_FILE_NAME, 'r') as file_object:
            self.address_book = pickle.load(file_object)
            
#Python 3

    def load(self):
        """
        Load a pickled address book from the standard save file
        """
        with open(SAVE_FILE_NAME, 'rb') as file_object:
            self.address_book = pickle.load(file_object)
#Python 3
    
"""
Addressbook.py
An address book program to store details of people I know.
Stuff I'm storing is:
first name
family name
email address
date of birth
[other stuff]

Brendan Scott
Feb 2015
"""

#### Imports
import pickle

#### Constants
SAVE_FILE_NAME = "address_book.pickle"

##### Classes Section
class AddressBook(object):
    """
    AddressBook instances hold and manage a list of people
    """
    def __init__(self):
        """ Set people attribute to an empty list"""
        self.people = []
        
    def add_entry(self, new_entry):
        """ Add a new entry to the list of people in the
        address book the new_entry should be an instance
        of the AddressEntry class"""
        self.people.append(new_entry)
        
    def save(self):
        """ save a copy of self into a pickle file"""
        with open(SAVE_FILE_NAME, 'wb') as file_object:
            pickle.dump(self, file_object)
            
            
class AddressEntry(object):
    """
    AddressEntry instances hold and manage details of a person
    """
    def __init__(self, first_name=None, family_name=None,
                  email_address=None, date_of_birth=None):
        """Initialize attributes first_name,
        family_name and date_of_birth.
        Each argument should be a string.
        date_of_birth should be of the form "MM DD, YYYY"
        """
        self.first_name = first_name
        self.family_name = family_name
        self.email_address = email_address
        self.date_of_birth = date_of_birth
        
    def __repr__(self):
        """
        Given an AddressEntry object self return
        a readable string representation
        """
        template = "AddressEntry(first_name='%s', "+\
                    "family_name='%s',"+\
                    "email_address='%s', "+\
                    "date_of_birth='%s')"
        return template%(self.first_name, self.family_name,
                          self.email_address, self.date_of_birth)
                          
                          
class Controller(object):
    """
    Controller acts as a way of managing the data stored in
    an instance of AddressBook and the user, as well as managing
    loading of stored data
    """
    def __init__(self):
        """
        Initialise controller. Look for a saved address book
        If one is found,load it, otherwise create an empty
        address book.
        """
        self.address_book = AddressBook()
        person1 = AddressEntry("Eric", "Idle", "March 29, 1943")
        self.address_book.add_entry(person1)
        
    def load(self):
        """
        Load a pickled address book from the standard save file
        """
        with open(SAVE_FILE_NAME, 'rb') as file_object:
            self.address_book = pickle.load(file_object)
                    
##### Functions Section

##### Main Section
if __name__ == "__main__":
    controller = Controller()
    print(controller.address_book.people)

Page 266
All code on this page is the same, and all outputs from the code are the same in Python 3 as in Python 2.7.

Page 267
Code is different:
* import pickle (not import cPickle as pickle)
* As explained above, use ‘rb’ to open the file, rather than ‘r’

           
#Python 3
#### Imports
import pickle
import os.path


#### Constants
SAVE_FILE_NAME = "address_book.pickle"


class Controller(object):
    """
    Controller acts as a way of managing the data stored in
    an instance of AddressBook and the user, as well as managing
    loading of stored data
    """
    def __init__(self):
        """
        Initialize controller. Look for a saved address book
        If one is found,load it, otherwise create an empty
        address book.
        """
        self.address_book = self.load()
        if self.address_book is None:
            self.address_book = AddressBook()
              
    def load(self):
        """
        Load a pickled address book from the standard save file
        """
        #TODO: Test this method
        if os.path.exists(SAVE_FILE_NAME):
            with open(SAVE_FILE_NAME, 'rb') as file_object:
                return pickle.load(file_object)
        else:
            return None

Page 270-272
This code uses raw_input. As explained in Python 3/Project 3 you need to either replace
all references to raw_input with just input or add new line raw_input = input
in the Constants section

            
#Python 3

#### Constants
raw_input = input
SAVE_FILE_NAME = "address_book.pickle"
INSTRUCTIONS = """Address Book Application
(Python For Kids For Dummies Project 9)
Press:
a to add an entry
d to display a list of all entries in summary form.
i to print these instructions again
q to quit.
"""
CONFIRM_QUIT_MESSAGE = 'Are you sure you want to quit (Y/n)? '


    def __init__(self):
        """
        Initialize controller. Look for a saved address book
        If one is found,load it, otherwise create an empty
        address book.
        """
        self.address_book = self.load()
        if self.address_book is None:
            self.address_book = AddressBook()
        self.run_interface()

    def run_interface(self):
        """ Application's main loop.
        Get user input and respond accordingly"""
        print(INSTRUCTIONS)
        while True:
            command = raw_input("What would you like to do? ")
            if command == "a":
                self.add_entry()
            elif command == "q":
                if confirm_quit():
                    print("Saving")
                    self.address_book.save()
                    print("Exiting the application")
                    break
            elif command == "i":
                print(INSTRUCTIONS)
            elif command == "d":
                self.display_summaries()
            else:
                template = "I don't recognise that instruction (%s)"
                print(template%command)
                
    def add_entry(self):
        """query user for values to add a new entry"""
        print("In add_entry")

    def display_summaries(self):
        """ display summary information for each entry in
        address book"""
        print("In display_summaries")

Page 274
Changes necessary for the code to work in Python 3:
* imports cPickle – just import pickle
* uses raw_input – Need to add a line raw_input = input in the Constants section
* uses ‘r’ and ‘w’ when opening files for pickle – need to use ‘rb’ and ‘wb’

#Python 3

"""
Addressbook.py
An address book program to store details of people I know.
Stuff I'm storing is:
first name

family name
email address
date of birth
[other stuff]
Brendan Scott
Feb 2015
"""


#### Imports
import pickle
import os.path


#### Constants
raw_input = input
SAVE_FILE_NAME = "address_book.pickle"
INSTRUCTIONS = """Address Book Application
(Python For Kids For Dummies Project 9)
Press:
a to add an entry
d to display a list of all entries in summary form.
i to print these instructions again
q to quit.
"""
CONFIRM_QUIT_MESSAGE = 'Are you sure you want to quit (Y/n)? '
SUMMARY_TEMPLATE = "%s %s DOB: %s email: %s"

##### Classes Section
class AddressBook(object):
    """
    AddressBook instances hold and manage a list of people
    """
    def __init__(self):
        """ Set people attribute to an empty list"""
        self.people = []
        
    def add_entry(self, new_entry):
        """ Add a new entry to the list of people in the
        address book the new_entry should be an instance                                      
        of the AddressEntry class"""
        self.people.append(new_entry)
        
    def save(self):
        """ save a copy of self into a pickle file"""
        with open(SAVE_FILE_NAME, 'wb') as file_object:
              pickle.dump(self, file_object)
              
              
class AddressEntry(object):
    """
    AddressEntry instances hold and manage details of a person
    """
    def __init__(self, first_name=None, family_name=None,
                    email_address=None, date_of_birth=None):
        """Initialize attributes first_name,
        family_name and date_of_birth.
        Each argument should be a string.
        date_of_birth should be of the form "MM DD, YYYY"
        """
        self.first_name = first_name
        self.family_name = family_name
        self.email_address = email_address
        self.date_of_birth = date_of_birth
        
    def __repr__(self):
        """
        Given an AddressEntry object self return
        a readable string representation
        """
        template = "AddressEntry(first_name='%s', "+\
                      "family_name='%s',"+\
                      " email_address='%s', "+\
                      "date_of_birth='%s')"
        return template%(self.first_name, self.family_name,
                          self.email_address, self.date_of_birth)
                            
                            
class Controller(object):
    """
    Controller acts as a way of managing the data stored in
    an instance of AddressBook and the user, as well as managing
    loading of stored data
    """
    def __init__(self):
        """
        Initialize controller. Look for a saved address book
        If one is found,load it, otherwise create an empty
        address book.
        """
        self.address_book = self.load()
        if self.address_book is None:
            self.address_book = AddressBook()
        self.run_interface()
        
    def load(self):
        """
        Load a pickled address book from the standard save file
        """
        if os.path.exists(SAVE_FILE_NAME):
            with open(SAVE_FILE_NAME, 'rb') as file_object:
                address_book = pickle.load(file_object)
            return address_book
        else:
            return None
            
    def run_interface(self):
        """ Application's main loop.
        Get user input and respond accordingly"""
        print(INSTRUCTIONS)
        while True:
            command = raw_input("What would you like to do? ")
            if command == "a":
                self.add_entry()
            elif command == "q":
                if confirm_quit():
                    print("Saving")
                    self.address_book.save()
                    print("Exiting the application")
                    break
            elif command == "i":
                print(INSTRUCTIONS)
            elif command == "d":
                self.display_summaries()
            else:
                template = "I don't recognise that instruction (%s)"
                print(template%command)
                
    def add_entry(self):
        """query user for values to add a new entry"""
        print("Adding a new person to the address book")
        print("What is the person's:")
        first_name = raw_input("First Name? ")
        if first_name == "q":
            print("Not Adding")
            return
        family_name = raw_input("Family Name? ")
        if family_name == "q":
            print("Not Adding")
            return
        email_address = raw_input("Email Address? ")
        if email_address == "q":
            print("Not Adding")
            return
        DOB_PROMPT = "Date of Birth (Month day, year)? "
        date_of_birth = raw_input(DOB_PROMPT)
        if date_of_birth == "q":
            print("Not Adding ")
            return
        entry = AddressEntry(first_name, family_name,
                             email_address, date_of_birth)
        self.address_book.add_entry(entry)
        values = (first_name, family_name)
        print("Added address entry for %s %s\n"%values)
            
    def display_summaries(self):
        """ display summary information for each entry in
        address book"""
        print("Displaying Summaries")
        for index, e in enumerate(self.address_book.people):
            values = (e.first_name, e.family_name,
                      e.date_of_birth, e.email_address)
            entry = SUMMARY_TEMPLATE%values
            print("%s: %s"%(index+1, entry))
            # start numbering at 1
           
           
##### Functions Section
def confirm_quit():
    """Ask user to confirm that they want to quit
    default to yes
    Return True (yes, quit) or False (no, don't quit) """
    spam = raw_input(CONFIRM_QUIT_MESSAGE)
    if spam == 'n':
        return False
    else:
        return True
        
        
##### Main Section
if __name__ == "__main__":
    controller = Controller()

Python for Kids: Python 3 – Project 8

Using Python 3 in Project 8 of Python For Kids For Dummies

In this post I talk about the changes that need to be made to the code of
Project 8 in order for it to work with Python 3. Most of the code in project 8 will work without changes.
However, in a lot of cases what Python outputs in Python 3 is different from the output in Python 2.7.

Disclaimer

Some people want to use my book Python for Kids for Dummies to learn Python 3.
I am working through the code in the existing book, highlighting changes from Python 2 to Python 3
and providing code that will work in Python 3. If you are using Python 2.7 you can ignore this post.
This post is only for people who want to take the code in my book Python for Kids for Dummies and
run it in Python 3.

Page 220

All code on this page is the same, and all outputs from the code are the same in Python 3 as in Python 2.7.

Page 222

All code syntax on page is the same, but some outputs are different in Python 3 – different output from type().

  
#Python 2.7
>>> "%s %s"%(1,2)
'1 2'
                             
                             
"%s %s"%(1) #(two specifiers, one value)
"%s %s"%(1,2,3) #(two specifiers, three values)
                              
                              
>>> values = (1,2)
>>> "%s %s"%values
'1 2'
>>> # Snuck in a tuple:
>>> type(values)
<type 'tuple'>
                              
                    
#Python 3 
>>> "%s %s"%(1,2)
'1 2'
                             
                             
"%s %s"%(1) #(two specifiers, one value)
"%s %s"%(1,2,3) #(two specifiers, three values)
                              

>>> values = (1,2)
>>> "%s %s"%values
'1 2'
>>> type(values)
<class 'tuple'>
>>> 
 

Page 223 – 224
All code on this page is the same, and all outputs from the code are the same in Python 3 as in Python 2.7.

Page 225
All code syntax on page is the same, but some outputs are different in Python 3 – different error messages.

  
#Python 2.7     
>>> def test_function():
        return (1,2,3) # returns a tuple with three elements
        
>>> a = test_function()
>>> a
(1, 2, 3)
>>> a,b,c = test_function()
>>> a
1
>>> b
2
>>> c
3
>>> a,b = test_function()

Traceback (most recent call last):
  File "<pyshell#59>", line 1, in <module>
    a,b = test_function()
ValueError: too many values to unpack
                            
                            
>>> a,b,c = (1,2,3) # unpack the tuple into a, b, c
>>> print("a: %s, b: %s, c: %s"%(a,b,c))
a: 1, b: 2, c: 3
>>> a,b = (1,2,3) # three values but only two variables.

Traceback (most recent call last):
  File "<pyshell#62>", line 1, in <module>
    a,b = (1,2,3)
ValueError: too many values to unpack

#Python 3
>>> def test_function():
        return (1,2,3) # returns a tuple with three elements
        
>>> a = test_function()
>>> a
(1, 2, 3)
>>> a,b,c = test_function()
>>> a
1
>>> b
2
>>> c
3
>>> a,b = test_function()
Traceback (most recent call last):
  File "<pyshell#27>", line 1, in <module>
    a,b = test_function()
ValueError: too many values to unpack (expected 2)
                            
                            
>>> a,b,c = (1,2,3) # unpack the tuple into a, b, c
>>> print("a: %s, b: %s, c: %s"%(a,b,c))
a: 1, b: 2, c: 3
>>> a,b = (1,2,3) # three values but only two variables.
Traceback (most recent call last):
  File "<pyshell#30>", line 1, in <module>
    a,b = (1,2,3) # three values but only two variables.
ValueError: too many values to unpack (expected 2)

Page 227-232

All code on these pages is the same, and all outputs from the code are the same in Python 3 as in Python 2.7.

Python for Kids: Python 3 – Project 7

Using Python 3 in Project 7 of Python For Kids For Dummies

In this post I talk about the changes that need to be made to the code of
Project 7 in order for it to work with Python 3. Most of the code in project 7 will work without changes. However, in a lot of cases what Python outputs in Python 3 is different from the output in Python 2.7 and it’s those changes that I am mainly identifying below.

Disclaimer

Some people want to use my book Python for Kids for Dummies to learn Python 3.
I am working through the code in the existing book, highlighting changes from Python 2 to Python 3 and providing code that will work in Python 3. If you are using Python 2.7 you can ignore this post. This post is only for people who want to take the code in my book Python for Kids for Dummies and run it in Python 3.

Page 178

All code on this page is the same, and all outputs from the code is the same in Python 3 as in Python 2.7

Page 179-180
The code and syntax on these pages is the same, but the outputs are
different in Python 3. This is because, in Python 3,
the range builtin does not create a list as in Python 2.7 (see Python3/Project 5)

#Python 2.7 code: 

>>> test_string = '0123456789'
>>> test_string[0:1]
'0'
>>> test_string[1:3]
'12'
>>> # range(10) is a list of the numbers from 0 to 9 inclusive
>>> range(10)[0:1]
[0]
>>> range(10)[1:3]
[1, 2]
>>> test_string[:3]
'012'
>>> test_string[3:]
'3456789'
#Python 3 code:
>>> test_string = '0123456789'
>>> test_string[0:1]
'0'
>>> test_string[1:3]
'12'
>>> # range(10) is no longer a list. It's a.... errr... range 
>>> # so the [:] operator slices. You can use list()
>>> # to see what it corresponds to.
>>> range(10)[0:1]
range(0, 1)
>>> list(range(10)[0:1])
[0]
>>> # note same output as in Python 2.7 from range(10)[0:1]
>>> range(10)[1:3]
range(1, 3)
>>> list(range(10)[1:3])
[1, 2]
>>> test_string[:3]
'012'
>>> test_string[3:]
'3456789'
>>> 

Pages 180-196
All code on this page is the same, and all outputs from the code is the same in Python 3 as in Python 2.7

Page 199

The code on this page uses raw_input, which has been renamed to input in Python 3.
Either change all occurrences or add a line

raw_input = input 

at the start of the relevant code.

#Python 2.7 code: 
#### Input and Output Section
message = raw_input("Type the message to process below:\n")
ciphertext = encrypt_msg(message, ENCRYPTION_DICT)
plaintext = decrypt_msg(message, DECRYPTION_DICT)
print("This message encrypts to")
print(ciphertext)
print # just a blank line for readability
print("This message decrypts to")
print(plaintext)

#Python 3 code: 
#### Input and Output Section
message = input("Type the message to process below:\n")
ciphertext = encrypt_msg(message, ENCRYPTION_DICT)
plaintext = decrypt_msg(message, DECRYPTION_DICT)
print("This message encrypts to")
print(ciphertext)
print # just a blank line for readability
print("This message decrypts to")
print(plaintext)


>>> ================================== RESTART ================================
>>>
Type the message you'd like to encrypt below:
I love learning Python. And my teacher is smelly. And I shouldn't start a sentence with and.
This message encrypts to
F|ilsb|ib7okfkd|Mvqelk+|xka|jv|qb79ebo|fp|pjbiiv+||xka|F|pelriak$q|pq7oq|7|pbkqbk9b|tfqe|7ka+
This message decrypts to
L2oryh2ohduqlqj2SBwkrq;2Dqg2pB2whdfkhu2lv2vphooB;22Dqg2L2vkrxogq*w2vwduw2d2vhqwhqfh2zlwk2dqg;

                             
>>> ================================== RESTART ================================
>>>
Type the message you'd like to encrypt below:
F|ilsb|ib7okfkd|Mvqelk+|xka|jv|qb79ebo|fp|pjbiiv+||xka|F|pelriak$q|pq7oq|7|pbkqbk9b|tfqe|7ka+
This message encrypts to
C_fip8_f84lhcha_Jsnbih(_uh7_gs_n846b8l_cm_mg8ffs(__uh7_C_mbiof7h!n_mn4ln_4_m8hn8h68_qcnb_4h7(
This message decrypts to
I love learning Python. And my teacher is smelly.  And I shouldn't start a sentence with and.

Page 200

This code works as is in both Python 2.7 and Python 3. However, the way the open() builtin works has changed in Python 3 and this will cause some issues in later projects. In Python 3 open() has the same syntax as in Python 2.7, but uses a different way to get data out of the file and into your hands. As a practical matter this means that some Python 2.7 code will sometimes cause problems when run in Python 3. If you run into such a problem (open code that works in Python 2.7 but fails in Python 3), the first thing to try is to add the binary modifier. So,
instead of ‘r’ or ‘w’ for read and write use ‘rb’ or ‘wb’. This code doesn’t need it, but a later project will.

Page 201

The code on this page is the same, but the outputs are different in Python 3. Python 3 returns how much data has
been written (in this case, 36)

#Python 2.7 code: 
>>> file_object = open('p4k_test.py','w')
>>> text = "print('Hello from within the file')\n" # watch the " and '
>>> file_object.write(text) # writes it to the file
>>> file_object.write(text) # writes it to the file again!
>>> file_object.close() # finished with file, so close it
#Python 3 code:
>>> file_object = open('p4k_test.py','w')
>>> text = "print('Hello from within the file')\n" # watch the " and '
>>> file_object.write(text) # writes it to the file
36
>>> file_object.write(text) # writes it to the file again!
36
>>> file_object.close() # finished with file, so close it

Pages 202 and 203

All code on these page is the same, and all outputs from the code is the same in Python 3 as in Python 2.7

Page 204

All code on this page is the same in Python 3 as in Python 2.7, but some of the outputs are different
A line has been added in the Python 3 code below to shown that the file_object has been closed after leaving the
with clause – this was explicit in the print out in Python 2.7.

>>> #Python 2.7
>>> with open('p4k_test.py','r') as file_object:
        print(file_object.read())
        
        
print('Hello from within the file')

>>> file_object
<closed file 'p4k_test.py', mode 'r' at 0xf7fed0>
       
       
>>> #Python 3
>>> with open('p4k_test.py','r') as file_object:
        print(file_object.read())

        
print('Hello from within the file')

>>> file_object  # output different from 2.7
<_io.TextIOWrapper name='p4k_test.py' mode='r' encoding='UTF-8'>

>>> file_object.closed # but the file is still closed
True

Page 205

All code on this page is the same in Python 3 as in Python 2.7, but some of the outputs are different
A line has been added in the Python 3 code below to shown that the file_object has been closed after leaving the
with clause – this was explicit in the print out in Python 2.7. Also, because Python 3 uses a different way
of getting information from a file it is identified differently. In Python 2.7 it’s call a file – pretty straight
forward. in Python 3 it’s called a _io.TextIOWrapper. Not as enlightening, but a student doesn’t need to worry about
this difference in detail.

>>> #Python 2.7
>>> with open('testfile2','w') as a:
        a.write('stuff')
        
>>> with open('testfile2','r') as a,
         open('p4k_test.py','r') as b:
        print(a.read())
        print(b.read())
        
stuff
print('Hello from within the file')

>>> a
<closed file 'testfile2', mode 'r' at 0xf6e540>
>>> b
<closed file 'p4k_test.py', mode 'r' at 0xef4ed0>


>>> #Python 3
>>> with open('testfile2','r') as a, open('p4k_test.py','r') as b:
	print(a.read())
	print(b.read())

	
stuff
print('Hello from within the file')

>>> a
<_io.TextIOWrapper name='testfile2' mode='r' encoding='UTF-8'>
>>> a.closed
True
>>> b
<_io.TextIOWrapper name='p4k_test.py' mode='r' encoding='UTF-8'>
>>> b.closed
True                                  

Page 207

All code on this page is the same in Python 3 as in Python 2.7, but some of the outputs are different
(the write method returns the amount of data written and this is output in the console in Python 3)

>>> #Python 2.7
>>> INPUT_FILE_NAME = "cryptopy_input.txt"
>>> with open(INPUT_FILE_NAME,'w') as input_file:
        input_file.write('This is some test text')

       
>>> #Python 3
>>> INPUT_FILE_NAME = "cryptopy_input.txt"
>>> with open(INPUT_FILE_NAME,'w') as input_file:
	input_file.write('This is some test text')

	
22

# this code is the same in Python 2.7 and Python 3:

INPUT_FILE_NAME = “cryptopy_input.txt”
OUTPUT_FILE_NAME = “cryptopy_output.txt”

Page 208-218
All code on this page is the same, and all outputs from the code is the same in Python 3 as in Python 2.7

Python for Kids: Python 3 – Project 6

Using Python 3 in Project 6 of Python For Kids For Dummies

In this post I talk about the changes that need to be made to the code of Project 6 in order for it to work with Python 3.  Most of the code in project 6 will work without changes. However, in a lot of cases what Python outputs in Python 3 is different from the output in Python 2.7.

Disclaimer

Some people want to use my book Python for Kids for Dummies to learn Python 3. I am working through the code in the existing book, highlighting changes from Python 2 to Python 3 and providing code that will work in Python 3. If you are using Python 2.7 you can ignore this post. This post is only for people who want to take the code in my book Python for Kids for Dummies and run it in Python 3.

Page 144:

Code and outputs are the same.

Page 145: code same, outputs different:

# Python 2.7 output

>>> dir(my_message)
['__add__', '__class__', '__contains__', '__delattr__',
'__doc__', '__eq__', '__format__', '__ge__',
'__getattribute__', '__getitem__', '__getnewargs__',
'__getslice__', '__gt__', '__hash__', '__init__', '__le__',
'__len__', '__lt__', '__mod__', '__mul__', '__ne__',
'__new__', '__reduce__', '__reduce_ex__', '__repr__',
'__rmod__', '__rmul__', '__setattr__', '__sizeof__',
'__str__', '__subclasshook__', '_formatter_field_name_split',
'_formatter_parser', 'capitalize', 'center', 'count',
'decode', 'encode', 'endswith', 'expandtabs', 'find',
'format', 'index', 'isalnum', 'isalpha', 'isdigit', 'islower',
'isspace', 'istitle', 'isupper', 'join', 'ljust', 'lower',
'lstrip', 'partition', 'replace', 'rfind', 'rindex', 'rjust',
'rpartition', 'rsplit', 'rstrip', 'split', 'splitlines',
'startswith', 'strip', 'swapcase', 'title', 'translate',
'upper', 'zfill']

# Python 3 output

>>> dir(my_message)
['__add__', '__class__', '__contains__', '__delattr__', 
'__dir__', '__doc__', '__eq__', '__format__', '__ge__', 
'__getattribute__', '__getitem__', '__getnewargs__', 
'__gt__', '__hash__', '__init__', '__iter__', '__le__', 
'__len__', '__lt__', '__mod__', '__mul__', '__ne__', 
'__new__', '__reduce__', '__reduce_ex__', '__repr__', 
'__rmod__', '__rmul__', '__setattr__', '__sizeof__', 
'__str__', '__subclasshook__', 'capitalize', 'casefold', 
'center', 'count', 'encode', 'endswith', 'expandtabs', 
'find', 'format', 'format_map', 'index', 'isalnum', 
'isalpha', 'isdecimal', 'isdigit', 'isidentifier', 
'islower', 'isnumeric', 'isprintable', 'isspace', 
'istitle', 'isupper', 'join', 'ljust', 'lower', 
'lstrip', 'maketrans', 'partition', 'replace', 'rfind', 
'rindex', 'rjust', 'rpartition', 'rsplit', 'rstrip', 
'split', 'splitlines', 'startswith', 'strip', 'swapcase', 
'title', 'translate', 'upper', 'zfill']

Page 146 – code same, outputs different:

# Python 2.7 output
>>> type('a string object')
<type 'str'>
>>> type([]) # that is, an empty list
<type 'list'>

# Python 3 output
>>> type('a string object')
<class 'str'>
>>> type([]) # that is, an empty list
<class 'list'>

# output for id() for both Python 2.7 and Python 3 is an integer

>>> id('a string object')
139900104204840

Page 147 – code same, outputs different

# Python 2.7 output

>>> help(my_message.upper) # spot the dot?
Help on built-in function upper:
upper(...)
    S.upper() -> string
    Return a copy of the string S converted to uppercase.
          

# Python 3 output          
>>> help(my_message.upper) # spot the dot?
Help on built-in function upper:

upper(...)
    S.upper() -> str
    
    Return a copy of S converted to uppercase.

Page 148 – code and outputs the same

Page 149 – Code the same, outputs different.
In Python 2.7 the range builtin creates a list. In Python 3 it creates a generator. The end result in this code is the same, but the way it is achieved is different.

# Python 2.7 
>>> range(3)
[0, 1, 2]
>>> for i in range(3):
        print(i)
0
1
2


# Python 3 output   
>>> range(3)
range(0, 3)
>>> for i in range(3):
        print(i)

        
0
1
2

Page 150 – Style error in the first code block on the page. Should have been print(i), otherwise code and outputs the same:

#Python 2.7
>>> for i in dir(my_message):
          print i
__add__
__class__
__contains__
[...]
# Python 3
>>> for i in dir(my_message):
          print(i)
__add__
__class__
__contains__
[...]          

Page 150 – balance of code – code same, outputs different

# Python 2.7

>>> string_object_attributes = dir(my_message)
>>> string_object_attributes
['__add__', '__class__', '__contains__', '__delattr__',
'__doc__', '__eq__', '__format__', '__ge__',
'__getattribute__', '__getitem__', '__getnewargs__',
'__getslice__', '__gt__', '__hash__', '__init__', '__le__',
'__len__', '__lt__', '__mod__', '__mul__', '__ne__',
'__new__', '__reduce__', '__reduce_ex__', '__repr__',
'__rmod__', '__rmul__', '__setattr__', '__sizeof__',
'__str__', '__subclasshook__', '_formatter_field_name_split',
'_formatter_parser', 'capitalize', 'center', 'count',
'decode', 'encode', 'endswith', 'expandtabs', 'find',
'format', 'index', 'isalnum', 'isalpha', 'isdigit', 'islower',
'isspace', 'istitle', 'isupper', 'join', 'ljust', 'lower',
'lstrip', 'partition', 'replace', 'rfind', 'rindex', 'rjust',
'rpartition', 'rsplit', 'rstrip', 'split', 'splitlines',
'startswith', 'strip', 'swapcase', 'title', 'translate',
'upper', 'zfill']


>>> dir(string_object_attributes)
['__add__', '__class__', '__contains__', '__delattr__',
'__delitem__', '__delslice__', '__doc__', '__eq__',
'__format__', '__ge__', '__getattribute__', '__getitem__',
'__getslice__', '__gt__', '__hash__', '__iadd__', '__imul__',
'__init__', '__iter__', '__le__', '__len__', '__lt__',
'__mul__', '__ne__', '__new__', '__reduce__', '__reduce_ex__',
'__repr__', '__reversed__', '__rmul__', '__setattr__',
'__setitem__', '__setslice__', '__sizeof__', '__str__',
'__subclasshook__', 'append', 'count', 'extend', 'index',
'insert', 'pop', 'remove', 'reverse', 'sort']
   
# Python 3
>>> string_object_attributes = dir(my_message)
>>> string_object_attributes
['__add__', '__class__', '__contains__', '__delattr__', 
'__dir__', '__doc__', '__eq__', '__format__', '__ge__', 
'__getattribute__', '__getitem__', '__getnewargs__', 
'__gt__', '__hash__', '__init__', '__iter__', '__le__', 
'__len__', '__lt__', '__mod__', '__mul__', '__ne__', 
'__new__', '__reduce__', '__reduce_ex__', '__repr__', 
'__rmod__', '__rmul__', '__setattr__', '__sizeof__', 
'__str__', '__subclasshook__', 'capitalize', 'casefold', 
'center', 'count', 'encode', 'endswith', 'expandtabs', 
'find', 'format', 'format_map', 'index', 'isalnum', 
'isalpha', 'isdecimal', 'isdigit', 'isidentifier', 
'islower', 'isnumeric', 'isprintable', 'isspace', 
'istitle', 'isupper', 'join', 'ljust', 'lower', 'lstrip', 
'maketrans', 'partition', 'replace', 'rfind', 'rindex', 
'rjust', 'rpartition', 'rsplit', 'rstrip', 'split', 
'splitlines', 'startswith', 'strip', 'swapcase', 'title', 
'translate', 'upper', 'zfill']


>>> dir(string_object_attributes)
['__add__', '__class__', '__contains__', '__delattr__', 
'__delitem__', '__dir__', '__doc__', '__eq__', '__format__', 
'__ge__', '__getattribute__', '__getitem__', '__gt__', 
'__hash__', '__iadd__', '__imul__', '__init__', '__iter__', 
'__le__', '__len__', '__lt__', '__mul__', '__ne__', '__new__', 
'__reduce__', '__reduce_ex__', '__repr__', '__reversed__', 
'__rmul__', '__setattr__', '__setitem__', '__sizeof__', 
'__str__', '__subclasshook__', 'append', 'clear', 'copy', 
'count', 'extend', 'index', 'insert', 'pop', 'remove', 
'reverse', 'sort']
   

Page 152-154 – code and outputs are the same

Page 155 – up to the warning box the code and outputs are the same

Page 155 Warning box:
The warning box on page 155 relies on the fact that in Python 2.7 the range() builtin returns a list. However, in Python 3 it returns a generator, so it doesn’t have a reverse method. You can get the same behavior [sic] if you force it to be a list using the list() builtin:

## Python 3 code:
>>> a_list = list(range(10))
>>> a_list
[0, 1, 2, 3, 4, 5, 6, 7, 8, 9]
>>> reversed_list = a_list.reverse()
>>> # reverse doesn't return a value!
>>> print(reversed_list)
None
>>> a_list
[9, 8, 7, 6, 5, 4, 3, 2, 1, 0]

Page 157-161 code and outputs the same

Page 162 – Code different
Change raw_input to input as explained in the Python 3 post for Project 5.

# Python 2.7
""" 1337.py
Given a message, convert it into 1337 sp34k
Brendan Scott
January 2015 """

TEST_MESSAGE = "Hello World!"
TEST_SUBSTITUTIONS = [['e','3']]
#### Function Section
def encode_message(message, substitutions):
    for s in substitutions:
        """Take a string message and apply each of the substitutions
        provided. Substitutions should be a list, the elements of
        substitutions need to be lists of length 2 of the form
        (old_string, new_string) """
        old = s[0]
        new = s[1]
        converted = message.replace(old,new)
    return converted
    
    
#### Testing Section
message = raw_input("Type the message to be encoded here: ")
converted_text = encode_message(message, TEST_SUBSTITUTIONS)
print(message)
print(converted_text)


# Python 3
""" 1337.py
Given a message, convert it into 1337 sp34k
Brendan Scott
January 2015 """

raw_input = input # this fixes raw_input!

TEST_MESSAGE = "Hello World!"
TEST_SUBSTITUTIONS = [['e','3']]
#### Function Section
def encode_message(message, substitutions):
    for s in substitutions:
        """Take a string message and apply each of the substitutions
        provided. Substitutions should be a list, the elements of
        substitutions need to be lists of length 2 of the form
        (old_string, new_string) """
        old = s[0]
        new = s[1]
        converted = message.replace(old,new)
    return converted
    
    
#### Testing Section
message = raw_input("Type the message to be encoded here: ")
converted_text = encode_message(message, TEST_SUBSTITUTIONS)
print(message)
print(converted_text)

Page 164 – Style error – should be print(s) not print s. With print(s) the code is the same in Python 2.7 and Python 3.

#Python 2.7 code: 
>>> substitutions = [['a','4'], ['e','3'], ['l','1'], ['o','0'], 
                     ['t','7']]
>>> for s in substitutions:
          print s
          
['a',  '4']
['e',  '3']
['l',  '1']
['o',  '0']
['t',  '7']
#Python 3 code:
>>> substitutions = [['a','4'], ['e','3'], ['l','1'], ['o','0'], 
                     ['t','7']]
>>> for s in substitutions:
          print(s)

          
['a', '4']
['e', '3']
['l', '1']
['o', '0']
['t', '7']

Page 166 Code different
Use input instead of raw_input as explained in the Python 3 post for Project 5. In this case, i have added raw_input = input after the docstring.

     
#Python 3 code:
""" 1337.py
Given a message, convert it into 1337 sp34k
Brendan Scott
January 2015 """

raw_input = input # this fixes raw_input!

TEST_MESSAGE = "Hello World!"
##TEST_SUBSTITUTIONS = [['e','3']]
SUBSTITUTIONS = [['a', '4'], ['e', '3'], ['l', '1'], ['o', '0'], 
                 ['t', '7']]
                 
#### Function Section
def encode_message(message, substitutions):
    """Take a string message and apply each of the substitutions
    provided. Substitutions should be a list, the elements of
    substitutions need to be lists of length 2 of the form
    (old_string, new_string) """
    for s in substitutions:
        old = s[0]
        new = s[1]
        converted = message.replace(old,new)
    return converted
    
#### Testing Section
message = raw_input("Type the message to be encoded here: ")
converted_text = encode_message(message, SUBSTITUTIONS)
print(message)
print(converted_text)

Page 168-169 Code different
Use input instead of raw_input as explained in the Python 3 post for Project 5. In this case, i have added raw_input = input after the docstring.


#Python 3 code:
""" 1337.py
Given a message, convert it into 1337 sp34k
Brendan Scott
January 2015 """

raw_input = input # this fixes raw_input!

TEST_MESSAGE = "Hello World!"
##TEST_SUBSTITUTIONS = [['e','3']]
SUBSTITUTIONS = [['a', '4'], ['e', '3'], ['l', '1'], ['o', '0'],
                 ['t', '7']]
                
#### Function Section
def encode_message(message, substitutions):
    """Take a string message and apply each of the substitutions
    provided. Substitutions should be a list, the elements of
    substitutions need to be lists of length 2 of the form
    (old_string, new_string) """
    for s in substitutions:
        old = s[0]
        new = s[1]
        converted = message.replace(old,new)
        print("converted text = "+converted) # Added
    print("Leaving encode_message") # Added
    
    return converted

#### Testing Section
message = raw_input("Type the message to be encoded here: ")
converted_text = encode_message(message, SUBSTITUTIONS)
print("started with "+message) # Changed
print("Converted to "+converted_text) # Changed

Page 170 Code different
Use input instead of raw_input as explained in the Python 3 post for Project 5. In this case, i have added raw_input = input after the docstring.


#Python 3 code:
""" 1337.py
Given a message, convert it into 1337 sp34k
Brendan Scott
January 2015 """

raw_input = input # this fixes raw_input!

TEST_MESSAGE = "Hello World!"
##TEST_SUBSTITUTIONS = [['e','3']]
SUBSTITUTIONS = [['a','4'], ['e','3'], ['l','1'], ['o','0'],
                 ['t','7']]
              
#### Function Section
def encode_message(message, substitutions):
    """Take a string message and apply each of the substitutions provided.
    Substitutions should be a list, the elements of substitutions need to
    be lists of length 2 of the form (old_string, new_string) """
    
    for s in substitutions:
        old = s[0]
        new = s[1]
        message = message.replace(old,new) # Changed
        print("converted text = "+message)
    print("Leaving encode_message") # Changed
    return message # Changed
    
#### Testing Section
message = raw_input("Type the message to be encoded here: ")
converted_text = encode_message(message, SUBSTITUTIONS)
print("started with "+message)
print("Converted to "+converted_text)
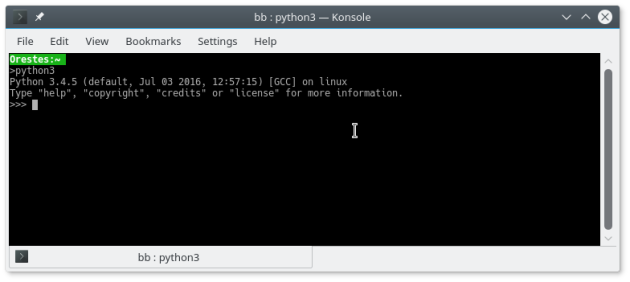
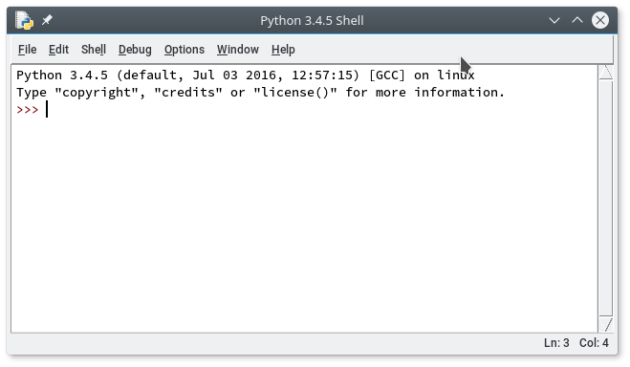
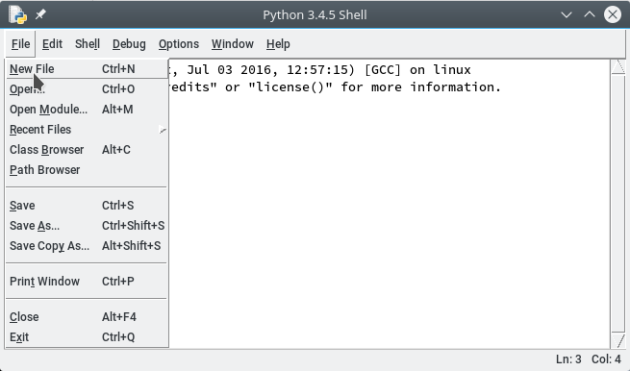
Python for Kids: Python 3 – Project 5

Disclaimer

Some people want to use my book Python for Kids for Dummies to learn Python 3. I am working through the code in the existing book, highlighting changes from Python 2 to Python 3 and providing code that will work in Python 3.

If you are using Python 2.7 you can ignore this post. This post is only for people who want to take the code in my book Python for Kids for Dummies and run it in Python 3.


Using Python3 in Project 5 of Python For Kids For Dummies

Project 5 introduces the concept of using functions for performing repetitive work when you’re programming.  All of the keywords introduced in this Project are the same and have the same syntax in Python 3, so you really shouldn’t have any trouble with this code – except for the fact that some of the code has raw_input in it and that caused problems in earlier chapters.  As I mentioned in my earlier post you can either:

  • replace every reference to raw_input by plain old input; or
  • at the top of your file add the line raw_input = input.

If you’re cutting and pasting  from the code on the website this is probably the easiest thing to do.

Basically, everything in this project will work if you use one of the two strategies above. However, some of the code will give a different output when run under Python3 compared to Python2.7. There is also one place where the code in the book is redundant.  This is the use of the float() builtin – Python3 automatically calculates its results using decimals.

Page 105 – 110:

All code on these pages is the same, and all outputs from the code is the same in Python 3 as in Python 2.7

Page 111-112

This code has raw_input. Add a line raw_input = input # this fixes raw_input! at the top of the file to get it working.

#Python 2.7 code:
import random

computers_number = random.randint(1,100)
prompt = 'What is your guess? '

while True:
    players_guess = raw_input(prompt)
    if computers_number == int(players_guess):
        print('Correct!')
        break
    elif computers_number > int(players_guess):
        print('Too low')
    else:
        print('Too high')

#Python 3 code:
import random
raw_input = input # this fixes raw_input!

computers_number = random.randint(1,100)
prompt = 'What is your guess? '

while True:
    players_guess = raw_input(prompt)
    if computers_number == int(players_guess):
        print('Correct!')
        break
    elif computers_number > int(players_guess):
        print('Too low')
    else:
        print('Too high')

Page 113

This code has raw_input. Add a line raw_input = input # this fixes raw_input! at the top of the file to get it working.

#Python 2.7 code:
"""guess_game_fun
Guess Game with a Function
In this project the guess game is recast using a function"""

import random

computers_number = random.randint(1,100)
PROMPT = 'What is your guess? '

def do_guess_round():
    """Choose a random number, ask the user for a guess
    check whether the guess is true
    and repeat until the user is correct"""
    while True:
        players_guess = raw_input(PROMPT)
        if computers_number == int(players_guess):
            print('Correct!')
            break
        elif computers_number > int(players_guess):
            print('Too low')
        else:
            print('Too high')

do_guess_round()
#Python 3 code:
"""guess_game_fun
Guess Game with a Function
In this project the guess game is recast using a function"""

import random
raw_input = input # this fixes raw_input!

computers_number = random.randint(1,100)
PROMPT = 'What is your guess? '

def do_guess_round():
    """Choose a random number, ask the user for a guess
    check whether the guess is true
    and repeat until the user is correct"""
    while True:
        players_guess = raw_input(PROMPT)
        if computers_number == int(players_guess):
            print('Correct!')
            break
        elif computers_number > int(players_guess):
            print('Too low')
        else:
            print('Too high')

do_guess_round()

Pages 114 – 116:

All code on these pages is the same, and all outputs from the code is the same in Python 3 as in Python 2.7

Page 117

This code has raw_input. Add a line raw_input = input # this fixes raw_input! at the top of the file to get it working.

#Python 2.7 code:
"""guess_game_fun
Guess Game with a Function
In this project the guess game is recast using a function"""

import random

computers_number = random.randint(1,100)
PROMPT = 'What is your guess? '

def do_guess_round():
    """Choose a random number, ask the user for a guess
    check whether the guess is true
    and repeat until the user is correct"""
    computers_number = random.randint(1,100) # Added
    while True:
        players_guess = raw_input(PROMPT)
        if computers_number == int(players_guess):
            print('Correct!')
            break
        elif computers_number > int(players_guess):
            print('Too low')
        else:
            print('Too high')

while True:
    # Print statements added:
    print("Starting a new Round!")
    print("The computer's number should be "+str(computers_number))
    print("Let the guessing begin!!!")
    do_guess_round()
    print("") # blank line

#Python 3 code:
"""guess_game_fun
Guess Game with a Function
In this project the guess game is recast using a function"""

import random
raw_input = input # this fixes raw_input!

computers_number = random.randint(1,100)
PROMPT = 'What is your guess? '

def do_guess_round():
    """Choose a random number, ask the user for a guess
    check whether the guess is true
    and repeat until the user is correct"""
    computers_number = random.randint(1,100) # Added
    while True:
        players_guess = raw_input(PROMPT)
        if computers_number == int(players_guess):
            print('Correct!')
            break
        elif computers_number > int(players_guess):
            print('Too low')
        else:
            print('Too high')

while True:
    # Print statements added:
    print("Starting a new Round!")
    print("The computer's number should be "+str(computers_number))
    print("Let the guessing begin!!!")
    do_guess_round()
    print("") # blank line

Pages 118 – 129:

All code on these pages is the same, and all outputs from the code is the same in Python 3 as in Python 2.7

Pages 130-131:

This code has raw_input. Add a line raw_input = input # this fixes raw_input! at the top of the file to get it working.

#Python 2.7 code:
"""guess_game_fun
Guess Game with a Function
In this project the guess game is recast using a function"""
import random

PROMPT = 'What is your guess? '

def do_guess_round():
    """Choose a random number, ask the user for a guess
    check whether the guess is true
    and repeat until the user is correct"""
    computers_number = random.randint(1, 100)
    number_of_guesses = 0 # Added

    while True:
        players_guess = raw_input(PROMPT)
        number_of_guesses = number_of_guesses+1 # Added
        if computers_number == int(players_guess):
            print('Correct!')
            return number_of_guesses # Changed
        elif computers_number > int(players_guess):
            print('Too low')
        else:
            print('Too high')

total_rounds = 0 # Added
total_guesses = 0 # Added

while True:
    total_rounds = total_rounds+1 # Added
    print("Starting round number: "+str(total_rounds)) # Changed
    print("Let the guessing begin!!!")
    this_round = do_guess_round() # Changed
    total_guesses = total_guesses+this_round # Added
    print("You took "+str(this_round)+" guesses") # Added
    avg = str(total_guesses/float(total_rounds)) # Added
    print("Your guessing average = "+avg) # Added
    print("") # blank line
#Python 3 code:
"""guess_game_fun
Guess Game with a Function
In this project the guess game is recast using a function"""
import random
raw_input = input # this fixes raw_input!

PROMPT = 'What is your guess? '

def do_guess_round():
    """Choose a random number, ask the user for a guess
    check whether the guess is true
    and repeat until the user is correct"""
    computers_number = random.randint(1, 100)
    number_of_guesses = 0 # Added

    while True:
        players_guess = raw_input(PROMPT)
        number_of_guesses = number_of_guesses+1 # Added
        if computers_number == int(players_guess):
            print('Correct!')
            return number_of_guesses # Changed
        elif computers_number > int(players_guess):
            print('Too low')
        else:
            print('Too high')

total_rounds = 0 # Added
total_guesses = 0 # Added

while True:
    total_rounds = total_rounds+1 # Added
    print("Starting round number: "+str(total_rounds)) # Changed
    print("Let the guessing begin!!!")
    this_round = do_guess_round() # Changed
    total_guesses = total_guesses+this_round # Added
    print("You took "+str(this_round)+" guesses") # Added
    avg = str(total_guesses/float(total_rounds)) # Added
    print("Your guessing average = "+avg) # Added
    print("") # blank line

Page 132:

This code has raw_input. Add a line raw_input = input # this fixes raw_input! at the top of the file to get it working. The code here is only a single side function. If you have the raw_input = input line earlier in the file you don’t need to add it again. I’m showing it here just for completeness.

#Python 2.7 code:
CONFIRM_QUIT_MESSAGE = 'Are you sure you want to quit (Y/n)? '

def confirm_quit():
    """Ask user to confirm that they want to quit
    default to yes
    Return True (yes, quit) or False (no, don't quit) """
    spam = raw_input(CONFIRM_QUIT_MESSAGE)
    if spam == 'n':
        return False
    else:
        return True

#Python 3 code:
CONFIRM_QUIT_MESSAGE = 'Are you sure you want to quit (Y/n)? '

def confirm_quit():
    """Ask user to confirm that they want to quit
    default to yes
    Return True (yes, quit) or False (no, don't quit) """
    spam = input(CONFIRM_QUIT_MESSAGE)
    if spam == 'n':
        return False
    else:
        return True        

Pages 133-134:

All code on these pages is the same, and all outputs from the code is the same in Python 3 as in Python 2.7

Page 135:

All code on these pages is the same, and all outputs from the code is the same in Python 3 as in Python 2.7. However:

  • see the errata on Project 5. The line avg = str(total_guesses/float(total_rounds)) needs to be moved; and
  • the use of float() is unnecessary. We did this because Python 2.7 thinks if you divide a whole number by a whole number you want a whole number as an answer. If you want a decimal you need to use float().  Python3 calculates using decimals by default so float() is unnecessary.

Here is the corrected code (works in both Python 2.7 and Python 3):


    # new if condition (and code block) to test against quit
    if this_round == QUIT:
        total_rounds = total_rounds - 1
        # removed line from here
        if total_rounds == 0:
            stats_message = 'You completed no rounds. '+\
                              'Please try again later.'
        else:
            avg = str(total_guesses/float(total_rounds)) # to here
            stats_message = 'You played ' + str(total_rounds) +\
                              ' rounds, with an average of '+\
                              str(avg)
        break

Page 136:

All code on these pages is the same, and all outputs from the code is the same in Python 3 as in Python 2.7.

Page 137:

This code has raw_input. Add a line raw_input = input # this fixes raw_input! at the top of the file to get it working. You also need to incorporate the fixes mentioned in relation to the code on page 135.

Here is the corrected code in Python 3:

#Working Python 3 code:
"""guess_game_fun
Guess Game with a Function
In this project the guess game is recast using a function"""

import random
raw_input = input # this fixes raw_input!
PROMPT = 'What is your guess? '

# New constants
QUIT = -1
QUIT_TEXT = 'q'
QUIT_MESSAGE = 'Thank you for playing'
CONFIRM_QUIT_MESSAGE = 'Are you sure you want to quit (Y/n)? '

# New confirm_quit function
def confirm_quit():
    """Ask user to confirm that they want to quit
    default to yes
    Return True (yes, quit) or False (no, don't quit) """
    spam = raw_input(CONFIRM_QUIT_MESSAGE)
    if spam == 'n':
        return False
    else:
        return True

def do_guess_round():
    """Choose a random number, ask the user for a guess
    check whether the guess is true
    and repeat until the user is correct"""
    computers_number = random.randint(1, 100)
    number_of_guesses = 0

    while True:
        players_guess = raw_input(PROMPT)
        # new if clause to test against quit
        if players_guess == QUIT_TEXT:
            if confirm_quit():
                  return QUIT
            else:
                  continue # that is, do next round of loop
        number_of_guesses = number_of_guesses+1
        if computers_number == int(players_guess):
            print('Correct!')
            return number_of_guesses
        elif computers_number > int(players_guess):
            print('Too low')
        else:
            print('Too high')

total_rounds = 0
total_guesses = 0

while True:
    total_rounds = total_rounds+1
    print("Starting round number: "+str(total_rounds))
    print("Let the guessing begin!!!")
    this_round = do_guess_round()

    # new if condition (and code block) to test against quit
    if this_round == QUIT:
        total_rounds = total_rounds - 1
        if total_rounds == 0:
            stats_message = 'You completed no rounds. '+\
                              'Please try again later.'
        else:
            avg = str(total_guesses/float(total_rounds))
            stats_message = 'You played ' + str(total_rounds) +\
                              ' rounds, with an average of '+\
                              str(avg)
        break
    total_guesses = total_guesses+this_round
    avg = str(total_guesses/float(total_rounds))
    print("You took "+str(this_round)+" guesses")
    print("Your guessing average = "+str(avg))
    print("")
# Added exit messages
print(stats_message)

Python for Kids: Python 3 – Project 4

Disclaimer

Some people want to use my book Python for Kids for Dummies to learn Python 3. I am working through the code in the existing book, highlighting changes from Python 2 to Python 3 and providing code that will work in Python 3.

If you are using Python 2.7 you can ignore this post. This post is only for people who want to take the code in my book Python for Kids for Dummies and run it in Python 3.

Using Python3 in Project 4 of Python For Kids For Dummies

Project 4 introduces the IDLE integrated development environment. When you download and install a version of Python 3 for Windows (I tested version 3.4.4)  you should get a folder called Python 3.4 (or whatever version you installed) in your Start Menu.  In that folder should be an entry called IDLE (Python 3.4 GUI – 32 bit).  If you run that you will be launched into the Python 3.4 equivalent of the IDLE mentioned in the book.

The good news is that pretty much everything in this project is the same for Python 3. That’s partly because the project is mainly concerned with introducing the IDLE environment and the concept of storing code in a file.  IDLE in Python 3 has all of the features listed in Project 4 as for Python 2.7:

Syntax highlighting (page 87)

Tab Completion (page 88/89)

Command history (page 90/91)

The IDLE Editor Window (page 92-95)

Comments (page 95-98)

Saving files (page 98)

Commenting out code (page 98-100) (the same commenting format -> # or triple quotes for docstrings “”” are the same in Python 3)

Indenting and dedenting code (page 101-102)

You should be able to breeze through Project 4 using Python 3.